Salsa de Caramelo / Caramel Sauce

Hoy os traigo una receta de salsa de caramelo: fácil, rapidísima y que se puede hacer al microondas!

La encontré en un blog llamado ‘Cookie and cups’ y la puede hacer cualquiera, así que probarla!


Today I bring you a caramel sauce recipe that is: easy, super quick and you can do it in the microwave!

I found it in a blog called ‘Cookies and Cups’ and it’s so easy everyone can make it so try it!

SONY DSC

Para un bote de salsa de caramel necesitarás:

  • 55 gr de mantequilla derretida
  • 220 gr de azúcar moreno
  • 120 ml de nata liquida
  • ½ cucharadita de esencia de vainilla


For one pot of caramel sauce you will need:

  • 55gr of melted butter
  • 220gr of brown sugar
  • 120 ml of cream
  • ½ tsp of vanilla essence


SONY DSC

En un bol apto para microondas mezclar, la mantequilla derretida, el azúcar y la nata hasta que estén integrados.

Meter al microondas a alta potencia durante 2 minutos. Sacarlo y remover.

Volver a meterlo durante otros 2 minutos hasta que salgan burbujitas y haya espesado.

Añadir la vainilla y dejar que temple y no este muy caliente, se hará mas espeso según se va enfriando.


In a microwave safe bowl mix the melted butter, the sugar and the cream until there are no lumps.

Heat in the microwave at high power for 2 minutes. Remove to stir and heat again for 2 other minutes until bubbly and slightly thickened.

Add the vanilla and let it cool until warm, not hot. It will thicken as it cools.

SONY DSC

Servir templado para acompañar helado, fruta, galletas o lo que se os ocurra. Si se enfría completamente, calentar 20-25 segundos al microondas. Se puede guardar en la nevera 1 semana.


Gracias por leerme!

Victoria


Serve warm with ice cream, fruit, cookies or whatever you want with. If completely cooled down, reheat for 20-25 seconds in the microwave. You can store it for 1 week in the fridge.


Thanks for reading!

Victoria

Macarons de chocolate/ Chocolate macarons

SONY DSC

Mi dulce favorito son los macarons, son unos pastelitos tradicionales franceses a base de claras de huevo y almendras molidas. Los hacen de muchos sabores, pero probablemente los mas típicos sean el de vainilla, el de frambuesa y como no, el de chocolate.

Los he hecho varias veces y no voy a mentiros, es bastante complicado. Esta receta está sacada del libro ‘Sucré’ de la Pastelería francesa especializada en macarons : La Durée y requiere paciencia y tiempo pero veréis como merece la pena!

My favourite sweets are macarons, a traditional French pastry made of egg whites and almond powder. There are lots of flavours you can have but the most typical are vanilla, raspberry and of course: chocolate.

I’ve made them several times and I’m not going to lie, it is pretty hard. This recipe is fro the book ‘Sucré’, by the famous French patisserie: La Durée, requires patience and time but you will see that the result is worth it!

Para 30 macarros aproximadamente

– 130 gr de almendras molidas

–  125 gr de azúcar glas

– 10 gr de cacao sin azúcar

–  35 gramos de chocolate (mínimo 70% de cacao)

–  3 claras de huevo + 1\2 clara de huevo

–  105 gr de azúcar

Para la ganache de chocolate:

-180 gr de chocolate (mínimo 70% de cacao)

– 135 ml de nata liquida

– 30 gr de mantequilla

For 30 macarons approximately

  • 130 gr of ground almonds
  • 125 gr of icing sugar
  • 8 gr of cocoa powder
  • 35 gr of chocolate (minimum 70% of cacao)
  • 3 egg whites +1\2 egg White
  • 105 gr of sugar

For the chocolate ganache

  • 180 gr of chocolate (minimum 70% of cacao)
  • 135 ml of cream
  • 30 gr of butter

SONY DSC

Empezamos por la ganache de chocolate. En un cazo ponemos la nata a calentar y cuando rompa a hervir la vertimos sobre el chocolate troceado. Mezclamos con una cuchara hasta tener una mezcla homogénea. Añadimos la mantequilla en trozos pequeñitos y mezclamos hasta que desaparezca.

Extendemos la ganache en una bandeja y la cubrimos con papel film de tal manera que el papel este en contacto con la ganache. Dejamos que se enfrié a temperatura ambiente y la metemos a la nevera durante una hora.

Let’s star with the ganache. In a saucepan heat up the cream, when it starts to boil, poor it onto the chopped chocolate. Mix together with a spoon until fully integrated. Add the butter chopped into small cubes and mix again until it melts together. Spread the ganache on a tray and cover it with cling paper so that the paper is touching the ganache. Leave it to come back to room temperature and put it in the fridge for an hour.

SONY DSC

Para la capa exterior de los macarons empezamos mezclando las almendras molidas, el azúcar glas y el cacao en polvo con la batidora hasta obtener un polvo fino. Tamizamos para evitar cualquier grumo que pueda quedar. Reservamos.

En otro recipiente fundimos el chocolate al baño maría  y dejamos templar

For the macarons we start by mixing the ground almonds, icing sugar and cocoa powder with the electric beater until we have a smooth powder. Stiff the mixture to avoid any lumps. Keep aside.

In another bowl, melt the chocolate over a double boiler and leave it to cool down to room temperature.

En un cuenco limpio y seco montamos a punto de nieve las tres claras y cuando estén listas vamos echando el azúcar, en tres partes, batiendo un minuto cada vez que incorporamos azúcar a la mezcla.

Vertimos el chocolate derretido sobre las claras y con una espátula de goma lo mezclamos e inmediatamente incorporamos las mezcla tamizada de almendras, azúcar glas y cacao.

En otro cuenco batimos la media clara restante y cuando empiece a formar espuma la añadimos a la mezcla y removemos con cuidado.

In a clean bowl whisk the 3 egg whites until stiff peaks are formed. Once this state reached, add the sugar in 3 parts beating 1 minute after adding each part.

Poor in the melted chocolate and integrate together with a rubber spatula. Immediately after this add the mixture of ground almonds, icing sugar and cocoa and mix.

In another bowl whisk the half egg white until bubbles appear and add it to the mixture mixing really slow and carefully.

SONY DSC

Introducimos la mezcla en una manga pastelera con la punta cortada. Cubrimos una bandeja de horno con papel de horno y formamos pequeños círculos de 3-4 cm. Movemos un poco la bandeja para que se extiendan bien.

Precalentamos el horno a 150ºC y dejamos los macarons reposar 10 minutos antes de hornearlos durante 16 minutos, hasta que se forme una ligera costra.

Put the mixture into a piping bag with it’s tip cut. On a baking tray lined with oven paper form small circles of 3-4 cm. Move the tray so that the macarons expand correctly.

Preheat the oven at 150ºC and leave the macarons to rest for 10 minutes before baking them for 16 minutes until a slight crust is formed.

Esperamos a que los macarons se enfríen completamente antes de despegarlos del papel. Ponemos baca abajo la mitad de los macarons. Los montamos poniendo un poco de ganache, que habremos metido en una manga pastelera con boquilla lisa, sobre los macaron que están boca abajo y coronamos con las tapas restantes.

Los guardamos en un recipiente hermético durante 12 horas en la nevera.

Wait until the macarons have completely cooled down to separate them from the oven paper. Turn upside down half of the macarons. Assemble by putting some of the chocolate ganache, which we have previously put in a piping bag with a round nozzle, on the macarons that are upside down. Top them with the rest of the lids.

Keep them in a hermetic container for 12 hours in the fridge.

SONY DSC

Sé que esta receta es larga y complicada pero seguro que con paciencia conseguís realizarla con éxito!

Ahora disfrutar de vuestros buenísimos macarons!
Victoria

I know this recipe is pretty hard, but with patience I’m sure you can pull it of!!

Now enjoy you delicious macarons!

Victoria

Frozen Chocolate Banana Popsicles /Polos de platano y chocolate

SONY DSC

Esta receta es perfecta para hacer con niños porque es sencilla y seguro que les encanta!


This recipe is perfect for doing it with kids because it’s really easy and they will love it!


Para 8 polos

-4 plátanos pequeños

-115 gr de chocolate para fundir

-una cucharada de aceite de girasol

– avellanas machacadas, coco rallado, sprinkles …

-8 brochetas, palitos de polo o lo que tengáis en casa.


For 8 popsicles


-4 small bananas

-115 gr of chocolate

– 1 tablespoon of sunflower oil

– Chopped hazelnuts, dried coconut, sprinkles…

-8 Popsicle stick, toothpicks or whatever you can find.

SONY DSC


Primero pelamos y cortamos los plátanos por la mitad. Insertamos el palito de madera y metemos al congelador durante 25 minutos, en un plato forrado con papel de horno para que no se pegue.


First peel and cut the bananas in half. Insert the popsicle stick, put the bananas on a plate lined with parchment paper and place them in the freezer for 25 minutes.


Mientras tanto derrite el chocolate con el aceite al año maría. Saca los plátanos del congelador y úntalos en el chocolate derretido, cubriéndolo completamente.


Meanwhile melt the chocolate with the oil over a double boiler. Dip the bananas in the mixture until fully covered.

SONY DSC

Cubrir antes de que se seque con lo que más os guste: avellanes, sprinkles, almendras, coco rallado … Podéis comerlos ahora o volver a meterlos al congelador. Recomiendo sacarlos 20 minutos antes de comerlos para que no estén demasiado duros.


Cover before it dries out with dried coconut, chopped hazelnuts, sprinkles… You can eat them right away or put them back in the freezer again I suggest you to take them out of the freezer 20 minutes before eating them. So that they are not very hard.

 SONY DSC

Que los disfrutéis!

Victoria ♥


Enjoy!

Victoria


Mousse de frambuesa/ Raspberry mousse

SONY DSC

Hola! Hoy os propongo una mousse de frambuesa que aparte de ser sencilla y estar buenísima es un postre perfecto para el verano.


Hello! Today I bring you a raspberry mousse that apart from being easy and delicious it is a perfect dessert for summer time.


Para 8 tarritos individuales:

–       500 gr de frambuesas (pueden ser frescas o congeladas)

–       100 gr de azúcar

–       150 gr de nata para montar

–       2 huevos

–       2 cucharadas de leche

–       3 hojas de gelatina.


For 8 individual pots

–       500 gr of raspberries (can be fresh or frozen)

–       100 gr of sugar

–       150 gr of cream

–       2 eggs

–       2 tbs of milk

–       3 gelatine sheets


SONY DSC

Primero ponemos las hojas de gelatina en agua fría para que se ablanden.

Mientras tanto reducimos las frambuesas a puré y ponemos en un cazo con el azúcar. Calentamos la mezcla, sin que llegue a hervir.

Una vez caliente retiramos del fuego y añadimos las hojas de gelatina escurridas para que se disuelvan. Dejamos que vuelva a temperatura ambiente.


First we put the sheets of gelatine in cold water to soften them.

Meanwhile, reduce the raspberries to puree and put the in a small saucepan with the sugar. Heat up the mixture, but don’t let it boil!

Once hot, remove from the heat and add the gelatine sheets in order for them to dissolve. Let the mixture cool down to room temperature.

SONY DSC

Montamos la nata y la leche, reservamos en la nevera.

En otro bol separamos las claras y las montamos a punto de nieve.

Añadimos el puré de frambuesa al bol de la nata montada y integramos.

Poco a poco añadimos las claras montadas.

Repartimos la mezcla en 8 tarritos.

Dejamos al menos 12 horas en la nevera y decoramos con frambuesas.


Whip the cream and the milk until stiff; put it in the fridge.

In another bowl separate the whites and the yolks and beat the egg whites until they form stiff peaks.

Add the raspberry puree to the cream and fold together.

Slowly add the egg whites and mix carefully.

Share out the mixture between the 8 little pots.

Let it stand in the fridge for at least 12 hours and the decorate with some extra raspberries.


Esta receta se la dedico a mi amiga Carmen, una fantástica cocinera, espero que os haya gustado!

Victoria  ♥


This recipe is dedicated to my friend Carmen, an amazing chef. Hope you liked it!

Victoria ♥

SONY DSC

Visita exprés a Suiza / Lighting trip to Switzerland

SONY DSC


El jueves pasado fui con parte de mi familia a la graduación de mi primo en Montreux. Aprovechamos para visitar la cuidad y sus alrededores. Pude disfrutar de las vistas al lago desde Caux y de las increíbles montañas de Gruyere; y todo esto comiendo fenomenal.


Last week I went to Montreux, Switzerland, to attend my cousin’s graduation. We visited the town and it’s surroundings. I enjoyed the views from Caux and the amazing mountains near Gruyere; all of it eating in great places!


SONY DSC

Gruyère


SONY DSC

Framboise à la crème- Le Chalet de Gruyère

SONY DSC


SONY DSC


SONY DSC

Restaurant ’45’ Hôtel Suisse-Majestic


SONY DSC

Lac Leman


SONY DSC

Tiramisú- Le Rouvenaz


Aunque solo fueron tres días los paisajes me enamoraron y he añadido Suiza a mi lista de destinos a los que me gustaría volver.


Although it was only a three-day trip, I’ve fallen in love with the landscapes and I added Switzerland to my list of places I have to come back to.

Victoria ♥

Mini Merengues/ Meringue kisses

IMG_1413

Esta es una de esas recetas que preparas cuando has utilizado yemas de huevo y te han sobrado un montón de claras. A mi siempre me ha dado pena tirarlas así que como solución: hago merengues.


This is one of those recipes you make when you have used egg yolks and you end up with a bowl of egg whites. I always feel bad about throwing them away so instead: I make mini meringues!

IMG_1410


Para unas tres docenas de merengues:

-300g de azúcar súper fina

– 150g de claras (5 claras)

– colorante alimenticio (opcional)


For three dozen of mini meringues:

-300g of superfine sugar

-150 g egg whites (about 5 eggs)

– Food coloring (optional)

kisses

Precalentamos el horno a 200ºC.

Batimos las claras en un bol hasta que se formen picos o hasta que podamos poner el bol boca abajo y no se caigan.

Después, mientras batimos a máxima velocidad añadimos el azúcar de cucharada en cucharada, comprobando que los picos vuelven a aparecer entre cada una.

Una vez todo el azúcar este añadido, continuamos batiendo unos 5-7 minutos. Sabremos que está listo cuando al pasarlo entre los dedos no notemos ni un granito de azúcar.


Preheat your oven at 200ºC.

Beat the egg whites until stiff peaks form and you can turn the bowl upside down without the eggs falling out.

Then, while you beat the whites at high speed add the sugar, one spoon at a time, checking the whites come back to stiff peaks after each spoon.

Once all the sugar is added, continue beating during 5-7 minutes. You will know it’s ready if you rub the mixture between your fingers and don’t feel any grit from the sugar.

IMG_1368

Para que salgan con rayitas de color, damos la vuelta a una manga pastelera y pintamos varias franjas con la ayuda de un pincel y nuestro colorante. Volteamos la manga para el colorante esté por dentro y introducimos nuestro merengue con cuidado. No hace falta poner boquilla, con cortar la punta de la  manga es suficiente.

To stripe the kisses, turn a piping bag inside out and paint some stripes of food coloring. Roll the bag so that the painted side in inside and spoon in your mixture. You won’t need a piping nozzle, only cut the end of the  piping bag.

 IMG_1416


En una bandeja de horno con papel de hornear encima, vamos presionando la manga para crear los merengues.

Horneamos 30-40 minutos hasta que los merengues se separen del papel con solo tocarlos. Dejamos que se enfríen y listo!

Espero que os haya gustado!
Victoria ♥


Pipe the kisses on a rimmed baking tray lined with parchment paper.

Bake for about 30-40 minutes, until the kisses separated from the paper with only touching them. Leave them to cool and they are ready to eat!

Enjoy!

Victoria ♥

Carta Flor / Flower Card

SONY DSC


Hace unos días mi tía, que es una manitas, me enseñó una tarjeta que había hecho como felicitación de cumpleaños . A primeras parece solo una flor pero al abrirla se descubre el texto o dibujos que queramos incluir.


A few days ago my aunt, who is very crafty, showed me a birthday card that she had made. A first glance it looks like a simple flower but when you open it, you discover a message inside it.

flores1


Vais a necesitar:

–       papel o cartulina del color o diseño que os guste más

–       tijeras

–       un lápiz

–       un compás

–       una regla

–       un botón y un cordón (opcional)


You will need:

–       paper or cardboard of your favorite color

–       a pair of scissors

–       a pencil

–       a pair of compasses

–       a ruler

–       a button and a piece of string (optional)

SONY DSC

Aquí os dejo el video que yo utilicé como guía y también un patrón que podéis imprimir y calcar en vuestra cartulina, para ahorraos tener que dibujarlo.


Here is the video I used and a pattern you can print and copy on your cardboard instead of drawing it yourself.

patron carta flor


Podéis hacerlas de varios tamaños y escribir lo que queráis dentro: felicitaciones, notas de agradecimiento, invitaciones a fiestas… lo que se os ocurra.

Espero que os haya gustado!

Victoria  ♥


You can make them bigger or smaller and use them as birthday cards, thank you notes or invitations.

Hope you liked it!

Victoria  ♥

SONY DSC

Cupcakes de Chocolate /Chocolate Cupcakes

SONY DSC

Hoy toca otra receta muy chocolateada! Cupcakes de chocolate con buttercream de chocolate. ¿Que más se puede pedir?


Today I’m sharing a very chocolaty recipe! Chocolate cupcakes with chocolate buttercream. What else can you ask for?


Para 12 cupcakes necesitarás:


-100gr de mantequilla a temperatura ambiente

– 180gr de azúcar

– 2 huevos

-165ml de leche entera

-150gr de harina

-una cucharadita de bicarbonato de sodio (lo venden en el supermercado y sino en la farmacia!)

– una pizca de sal

– 40gr de cacao en polvo


Para la buttercream:

–       150 gr de mantequilla a temperatura ambiente

–       150 gr de azúcar glas

–       90 gr chocolate negro


For 12 cupcakes you will need:

-100gr of softened butter

– 180gr of sugar

-2 eggs

-165 gr of whole milk

-150gr of plain flour

– 1 tsp of baking soda

– a pinch of salt

-40gr of cocoa powder


For the buttercream:

–       150gr of softened butter

–       150gr of icing sugar

–       90 gr of dark chocolate

SONY DSC

Para la masa precalentamos el horno a 180ºC y preparamos nuestras 12 cápsulas de papel.

Batimos la mantequilla y el azúcar hasta que sea una mezcla cremosa. Añadimos los huevos y la leche; batimos.

Incorporamos la harina tamizada, el cacao, la sal y el bicarbonato de sodio. Repartimos la masa en nuestras cápsulas de papel sin llenar mas de ¾ .

Horneamos 15 minutos, hasta que al clavar una brocheta salga limpia. Las dejamos enfriar por completo sobre una rejilla.


Pre-heat the oven at 180ºC and get ready 12 paper cases.

Beat the butter and the sugar together until soft and creamy. Beat in the eggs and the milk.

Sift in the floor, cocoa, salt and baking soda and stir to mix. Spoon the mixture into the paper cases.

Bake for 15 minutes and check if they are ready by inserting a cocktail stick to the centre (it needs to come out clean). Leave to cool completely on a wire rack.


image (1)

Para preparar la buttercream, fundimos el chocolate al baño maría y mientras que se templa batimos a máxima velocidad el azúcar tamizado con la mantequilla. Pasados 5 minutos la mezcla se habrá aclarado y habrá aumentado su volumen. Sin dejar de batir, incorporamos el chocolate y batimos 2 minutos más.

Decoramos con ayuda de una manga pastelera y nuestra boquilla favorita (yo he usado de estrella)


Espero que os haya gustado.

Hasta pronto!

Victoria ♥


SONY DSC 

For the buttercream, melt the chocolate over a double boiler, and let it cool. Meanwhile beat the butter and the sugar for 5 minutes, after this time; the mixture will be lighter in colour and increased in size. Without stopping the electric beater, mix in the chocolate and beat for 2 more minutes.

Decorate your cupcakes with a piping bag and your favourite nozzle (I used a star nozzle).


Hope you liked it.

See you soon!

Victoria ♥


SONY DSC

Huevos al horno con bacon, queso y espinacas/ Baked eggs with bacon, cheese and spinach

IMG_1489


Hoy os traigo una receta muy fácil y rápida de huevos al horno con bacon, espinacas y queso. Es perfecta si tenéis invitados porque podéis dejarlo preparado y solo meterlo al horno justo antes de servir. La receta es del blog ‘The little epicurean’.


Today I bring you a really easy and quick recipe of oven baked eggs with bacon, spinach and cheese. It’s perfect if you are hosting a dinner with friends because you can have it ready in advance and then put it in the oven just before serving. The recipe is from the blog ‘The little epicurean’.

Huevosalhoro


Para 4 personas necesitarás:

-4 huevos

-3 lonchas de bacon cortadas en trocitos

-4 puñados de espinacas frescas

– queso rallado (yo usé Emmental)

-sal y pimiento


For 4 people your will need:-4 eggs

            – 4 handfuls of spinach

            -3 slices of bacon cut into small pieces.

            – Some grated cheese

            – Salt and pepper


IMG_1490


Precalentar el horno a 180ºC. Engrasar con un poquito de mantequilla 4 cuencos pequeños.

En una sartén freír el bacon hasta que esté dorado y crujiente. Sacarlo de la sartén y dejarlo en un plato con papel de cocina. En la misma sartén, con la grasa que queda del bacon, cocinar las espinacas hasta que hayan perdido gran parte de su volumen.


Repartir las espinacas en los cuencos y después distribuir el bacon encima de las espinacas. Espolvorear un poco de queso rallado. Añadir un huevo a cada bol y sazonar con sal y pimiento al gusto.


Preheat the oven at 180ºC. Lightly butter 4 little bowls or ramekins, set aside.


In a skillet cook the bacon until browned and crispy. Transfer it to a paper towel lined plate. In the same skillet with the remaining bacon-grease, cook the spinach at low-medium heat until they have significantly decreased in volume.


Distribute them between the little bowls. Then distribute the bacon on top of the spinach. Sprinkle some grated cheese and add one cracket egg in each bowl. Season with some salt and pepper.


IMG_1482


Meter en el horno durante 15-18 minutos, hasta que la clara esté cocinada pero la yema siga algo liquida.

Añadir más queso si se quiere. Servir con pan tostado.

Espero que os haya gustado! Gracias por leerme.

Victoria ♥


Bake for 15-18 minutes until the egg withes are cooked but the yolk stills a little bit runny.

Sprinkle some more cheese if desired. Server with some toasted bread.


Hope you liked it! Thanks for stopping by.

Victoria ♥

Tarta de cerditos en el barro / Pigs in the mud cake

SONY DSC


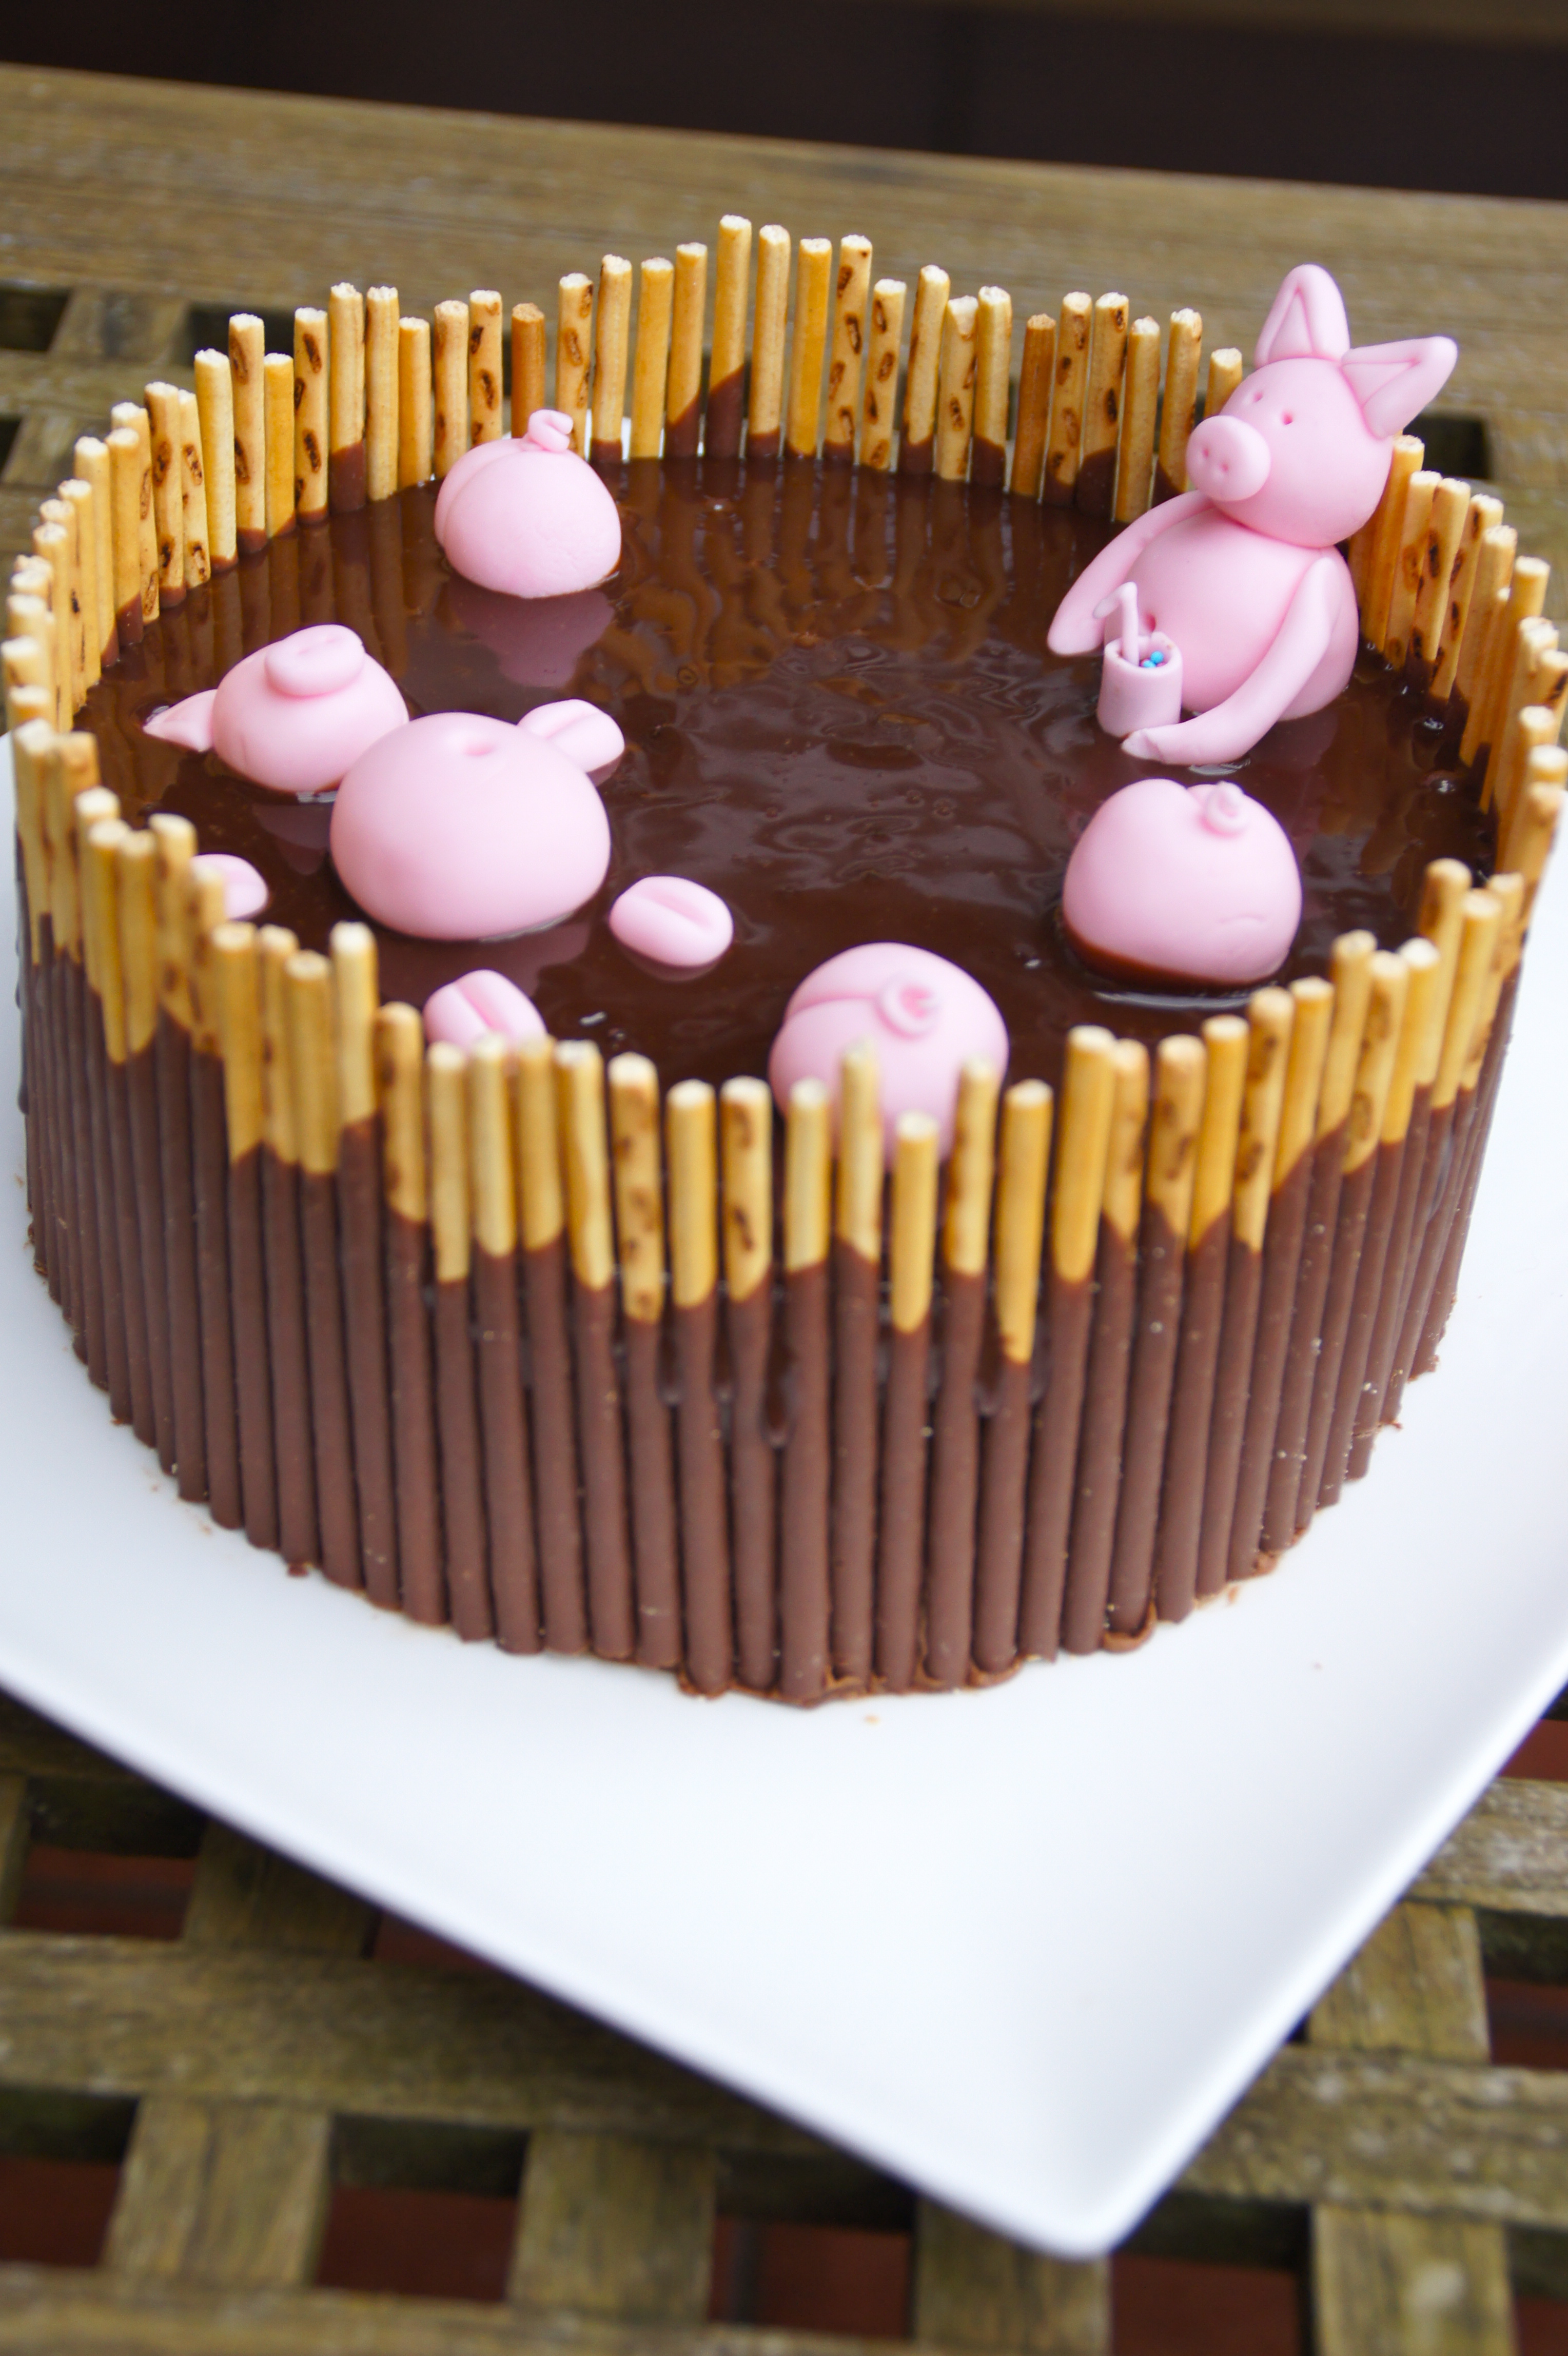
Tengo una lista de tartas que quiero intentar hacer aunque sea una vez en la vida. Esta era una de ellas. Investigando recetas en páginas web y blogs me topé con la foto de una tarta de cerditos en el barro. Iba rodeada de kit-kats en vez de mikados y no se veía el interior, pero me encantó. Estaba en una página de ideas originales para cumpleaños de niños asi que aprovechando que mi primo Mikel cumplía 4 años, la hice.

No os voy a mentir, lleva su tiempo, pero merece la pena. Aunque solo sea para ver la cara del niño al que se la pongáis delante, cuando vea que su tarta tiene cerditos dándose un baño de chocolate.

Es una tarta con tres capas de bizcocho de chocolate, rellenas de una crema de chocolate y coronado con una ganache de chocolate con leche. Una bomba.


I have a list of cakes that I want to make at least once in my live. This was one of them. Checking out some cooking web pages and blogs, I found a picture of a cake with pigs in the mud. It had kit-kats instead of mikados and you couldn’t see the inside but I loved it. It was part of some original ideas for children’s birthday parties, so, since my little cousin Mikel was turning 4, I made it.

I’m not going to lie, this cake takes some time, but it’s worth it. Even if it’s only for seeing the look of a little boy when he realises his cake is topped with little pigs swimming in chocolate.

It is made of 3 layers of chocolate cake filled with chocolate buttercream and topped with milk chocolate ganache. You’ve got to love chocolate!

SONY DSC


La receta del bizcocho es del libro ‘Objetivo: tarta perfecta’ de Alma Obregón.


Para el bizcocho (3 moldes de 18 cm)

–       80ml de aceite de oliva suave

–       250gr de azúcar

–       150gr de harina

–       50g de cacao

–       2 cucharaditas de levadura

–       2 huevos

–       150ml de leche

–       1 cucharadita de extracto de vainilla

–       150ml de agua hirviendo


Precalentamos el horno a 180ºC y engrasamos los moldes. En un recipiente tamizamos la harina, la levadura y el cacao (es fundamental para que no nos queden grumos en la masa). Reservamos.

En otro bol batimos el aceite, azúcar y los huevos y cuando estén bien integrados incorporamos la harina, levadura y cacao.  Cuando la mezcla sea homogénea añadimos la leche y la vainilla; agregamos el agua hirviendo  y volvemos a batir. No os asustéis si la masa os queda muy liquida, es normal.

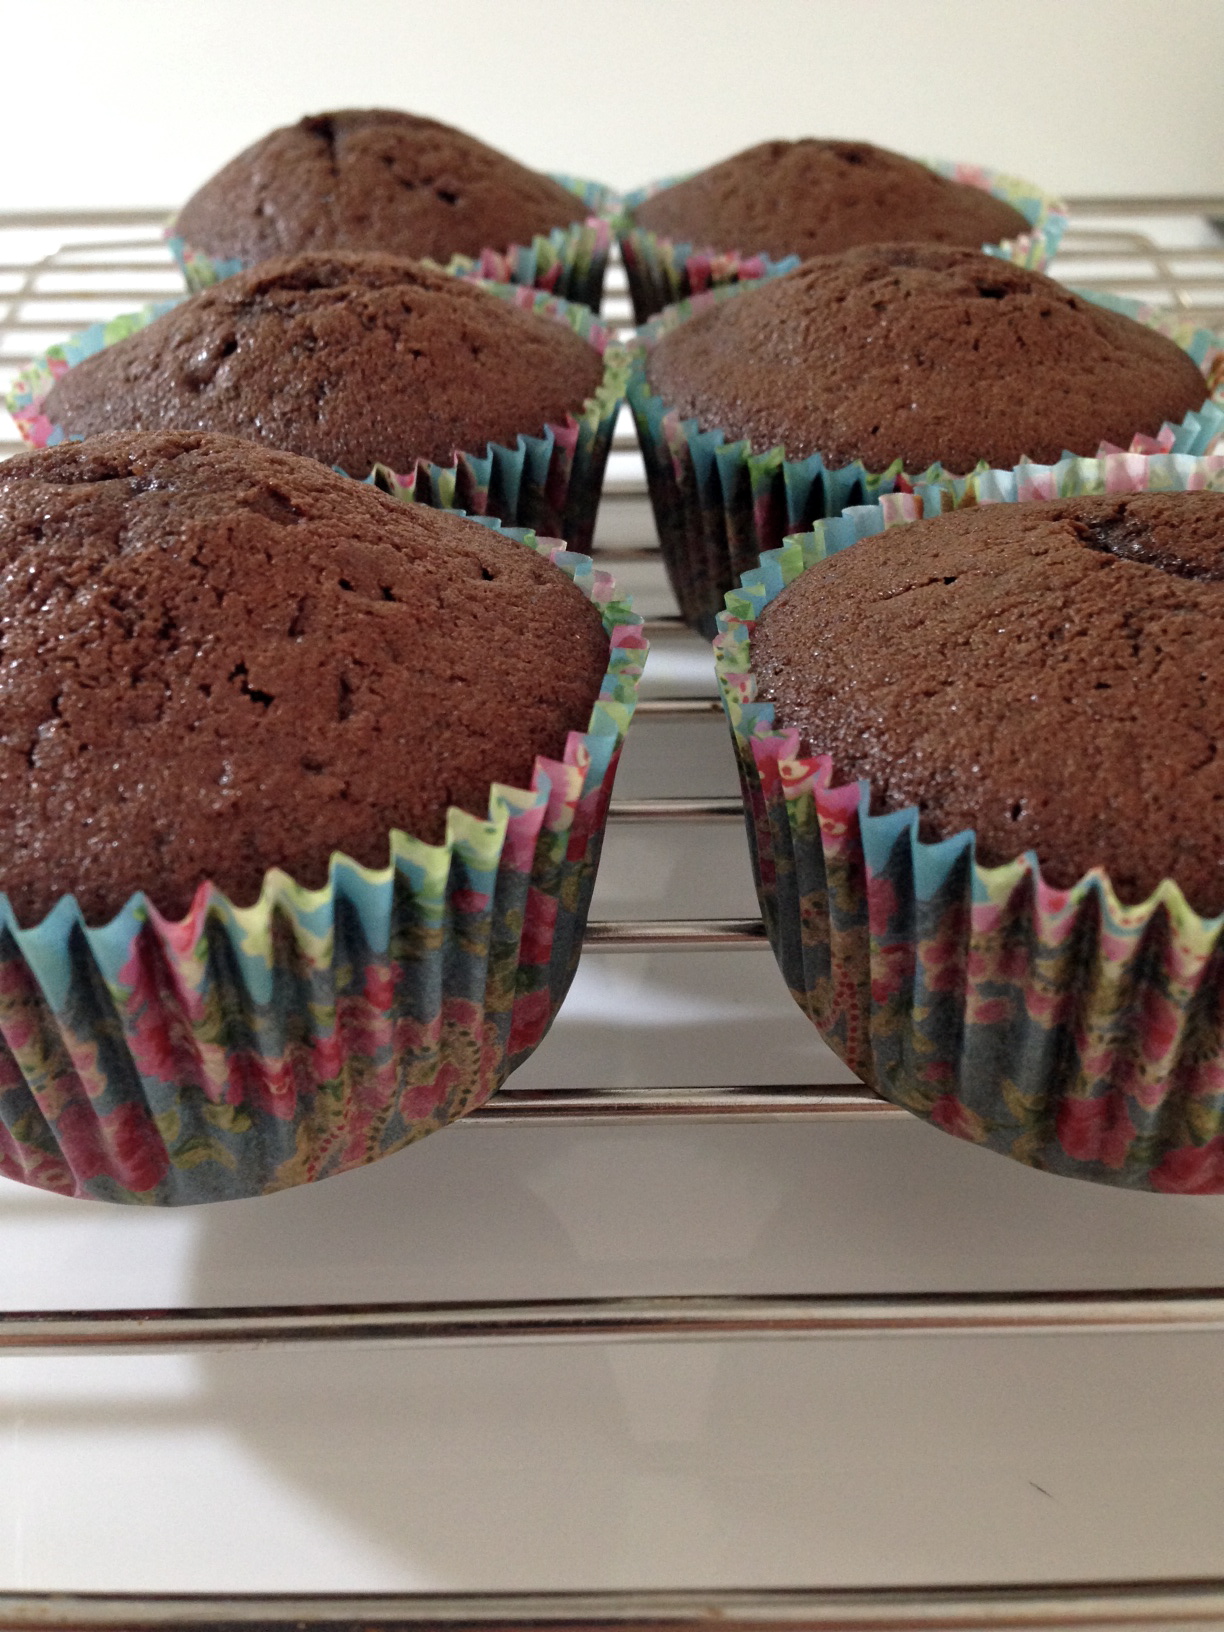
Repartimos la mezcla en los 3 moldes y horneamos durante 20-25 minutos o hasta que los bordes del bizcocho se separen del molde. Esperamos a que se enfríen y desmoldamos. Si no esperáis a que se enfríen tenéis posibilidades de que se os rompan al desmoldar porque al estar calientes son muy frágiles.


The recipe of the cake is from a book called ‘Objetivo: tarta perfecta’ (goal: perfect cake) by Alma Obregón.


 For the cake (for 3 cake tins of 18cm each):

–       80ml of light olive oil

–       250gr of sugar

–       150gr of flour

–       50gr of cocoa powder

–       2 tsp. of baking powder

–       2 eggs

–       150ml of milk

–       1tsp of vanilla extract

–       150ml of boiling water


Preheat the oven at 180ºC and butter the cake tins. In a bowl, sift together the flour, baking powder and cocoa powder (this is important in order to avoid lumps in our batter). Set aside.

In another bowl mix the eggs, the oil and the sugar. Then add the flour, baking powder and cocoa powder.  Once combined pour in the milk and the vanilla and beat; incorporate the boiling water and mix again. Don’t panic if the mixture is very liquid, that’s how it’s supposed to be.

Share out the batter in the 3 cake tins and bake for 20-25 minutes or until the edges of the cake have came off the side of the tin. Wait for it to cool before removing from the tin. If you don’t wait your risk for you cake to break because when it stills hot it is very fragile.

SONY DSC


Para la crema de chocolate:

–       150 gr de mantequilla a temperatura ambiente

–       150gr de azúcar glas

–       90 gr de chocolate negro


Fundimos el chocolate al baño maría y mientras que se templa batimos a máxima velocidad el azúcar tamizado con la mantequilla. Pasados 5 minutos la mezcla se habrá aclarado y habrá aumentado su volumen.  Sin dejar de batir, incorporamos el chocolate y batimos 2 minutos más.


For the chocolate buttercream

–       150gr of butter, room temperature

–       150gr of icing sugar

–       90gr of dark chocolate


Melt the chocolate over a double boiler, and let it cool. Meanwhile beat the butter and the sugar for 5 minutes, after this time, the mixture will be lighter in colour and increased in size. Without stopping the electric beater, mix in the chocolate and beat for 2 more minutes.


El ‘barro’ en el que están los cerditos es una ganache de chocolate con leche.

Necesitaremos:


-75ml de nata líquida

– 75 gr de chocolate con leche.


Para hacerla basta con calendar en un cazo de nata liquida y cuando rompa a hervir verterla sobre el chocolate . Esperar un minuto y remover con una cuchara. Fácil verdad?


The ‘mud’ in which the little pigs are, is a milk chocolate ganache.

You will need:

-75ml of cream

-75gr of milk chocolate


You just need to warm up the cream in a saucepan and when it starts to boil, pour it onto the chocolate. Wait for 1 minute and stir with a spoon. Isn’t it easy?

SONY DSC


Ahora toca montar y decorar la tarta.


Vamos a necesitar:

–       4 cajas de Mikados (yo he usado de chocolate con leche)

–       Fondant para hacer los cerditos


En el plato en el que vayamos a servir la tarta alternamos una capa de bizcocho con una de crema, pero sin poner crema en el último piso. Con lo que nos quede de crema cubrimos los lados. No hace falta que los dejemos perfectos ya que irán cubierto por nuestros mikados.

Colocamos los mikados alrededor de toda la tarta. Yo los he cortado porque me parecía que quedaban demasiado altos, pero podéis dejarlos largos si os gustan más.

SONY DSC


Now it’s time to assemble and decorate our cake.

We will need:

            -4 boxes of Mikado (I used the milk chocolate ones)

            -Fondant to make the little pigs


In a serving plate place one of you cakes and cover it with your buttercream, repeat with the next one and then place your third cake on top, but don’t cover this one with buttercream. Cover the sides of the cake with the rest of your buttercream. It doesn’t need to be perfect since it will be hidden with the mikados.

Place the mikados all around the cake, I cut them because I found them too tall for the cake, but you don’t need to if you don’t want.

SONY DSC


Muy despacio vertemos la ganache, que debe estar templada, sobre la tarta y con la ayuda de una cucharita repartimos bien para que no quede ningún espacio descubierto. Metemos a la nevera durante 15 minutos para que se asiente.


Slowly pour the ganache, cooled down, on top of the cake and with a spoon cover any uncovered space. Put in the fridge fro 15 minutes for it to settle.


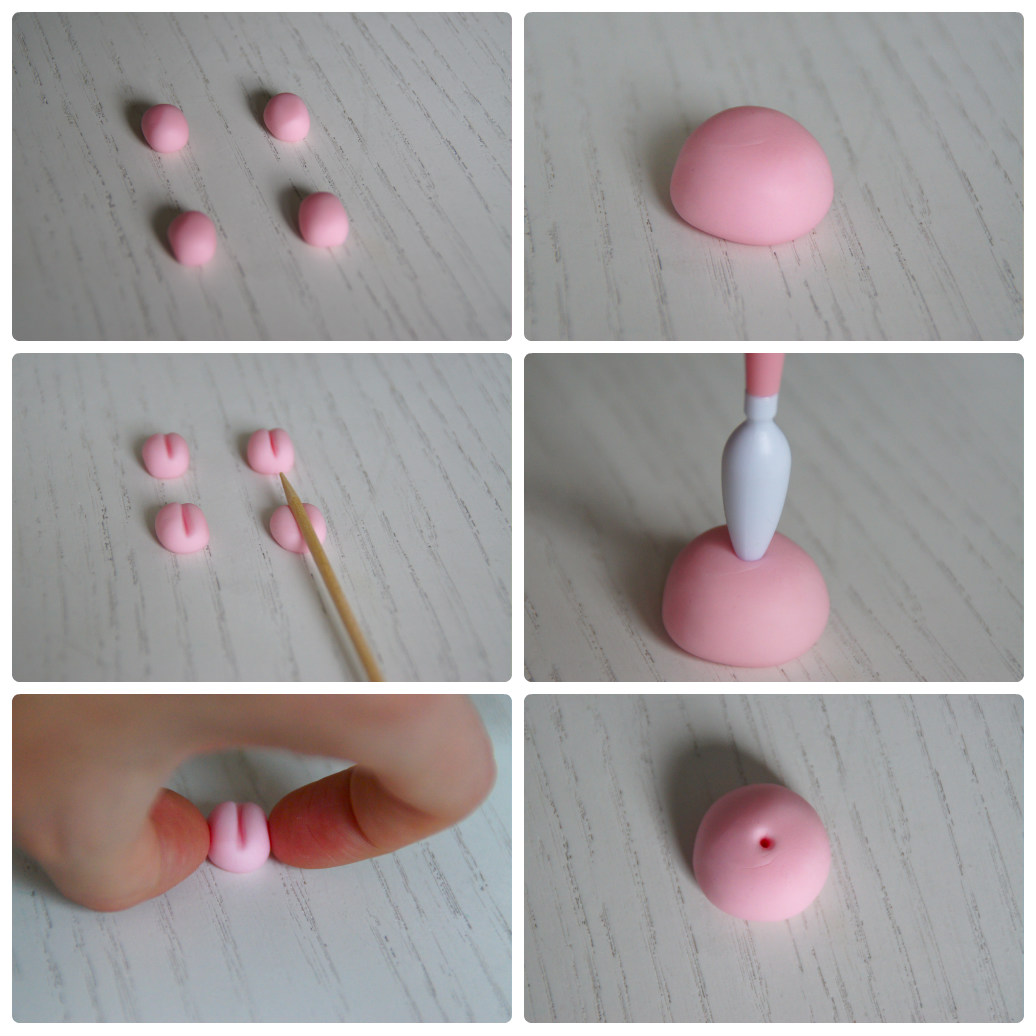
Ahora toca moldear los cerditos con el fondant.

Now it’s time to make the little pigs with the fondant.

Estas son las patitas y la tripa del cerdito tumbado.

Estas son las patitas y la tripa del cerdito tumbado/ This are the hoofs and the belly of the pig that is laying down.


cerdito2

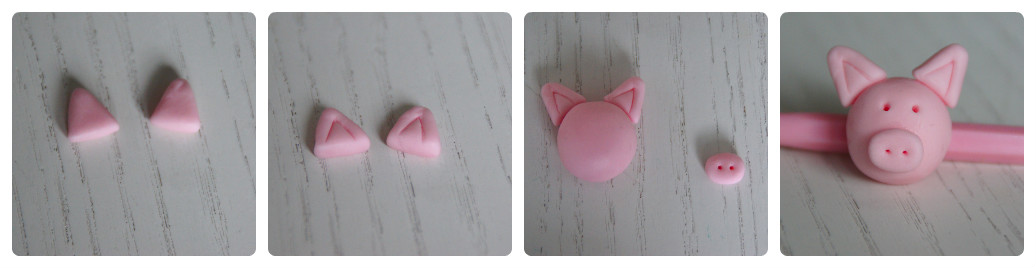
Así se hacen las cabezas/ Steps to make the heads.


cerditos3

Estos son los pasos para los traseros de los cerditos/ This are the steps for the bottoms of the pigs.

cerdito4

El cerdito sentado/ The sitting pig


Espero que os haya gustado! / Hope you enjoyed!

Victoria ♥cerdito5