Quesadillas de Halloween / Halloween Quesadillas

quesadillas

Hola! Ya se acerca Halloween y os traigo un receta súper sencilla que casi se puede considerar una manualidad: unas quesadillas de halloween!

Hey! It’s almost Halloween and I wanted to share with you this super simple recipe that is kind of a DIY: halloween quesadillas!

Para 2 quesadillas:

  • 4 tortitas mejicanas para fajitas
  • Queso rallado (yo usé cheddar)
  • Una aceituna

For 2 quesadillas:

  • 4 mexican soft tortillas 
  • Grated cheese (I used cheddar)
  • An olive


calabaza

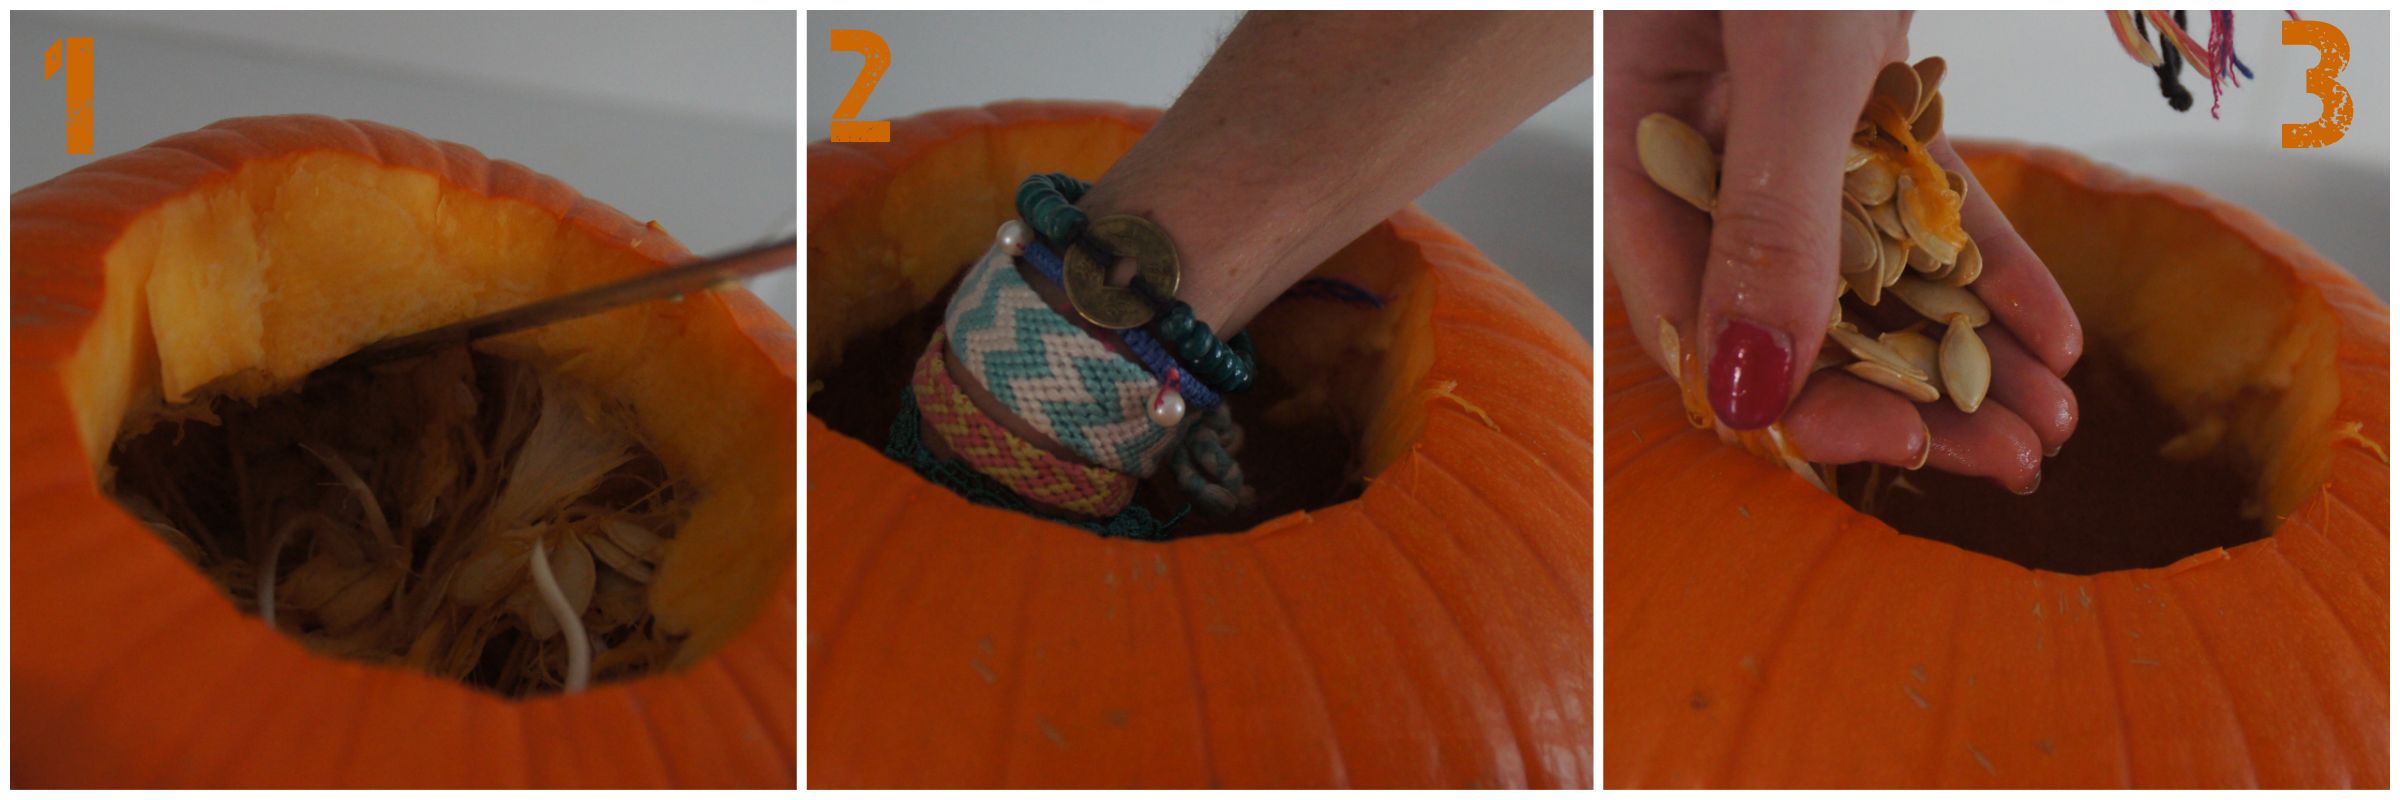
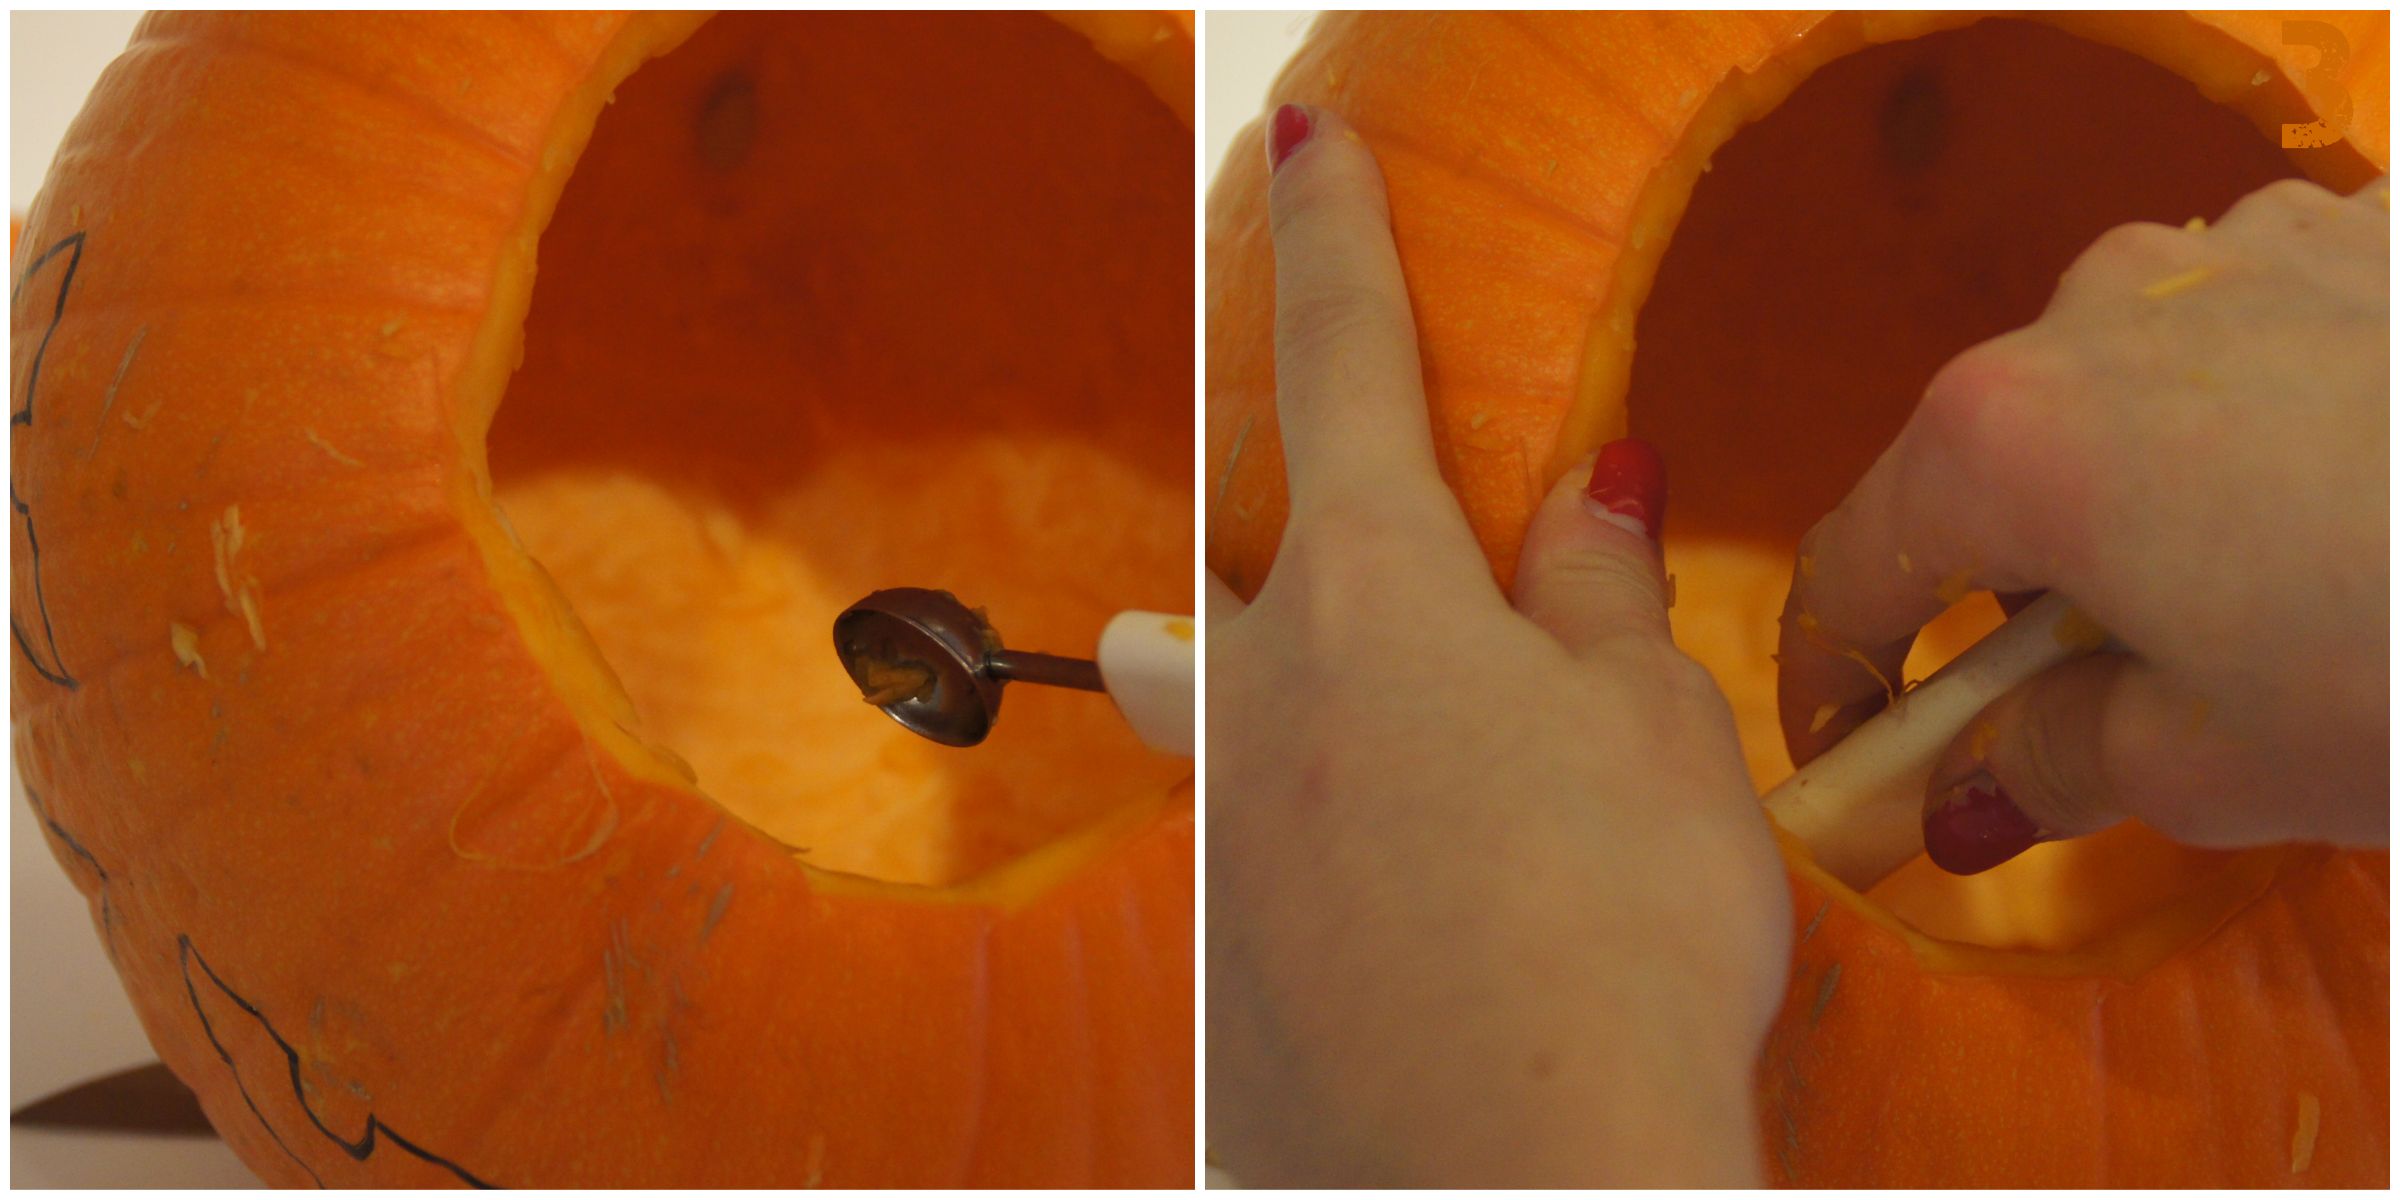
Para la calabaza cortamos en una de las tortitas los ojos, la boca y la parte de arriba dejando una tira que será el rabo de la calabaza.

Esparcimos quedo rallado en la otra tortita (en la que habremos recortado la parte de arriba tambien) y colocamos la tortita con cara encima del queso.

Calentamos en el microondas 1 minutos.


For the jack-o-lantern cut out the eyes, mouth and top of the pumkin in one of the tortillas.

Then sprinkle some cheese on another one and cover with the first one. I also cut the top of the tortilla underneath but it’s up to you.

Heat in the micro wave for 1 minute.


mummie
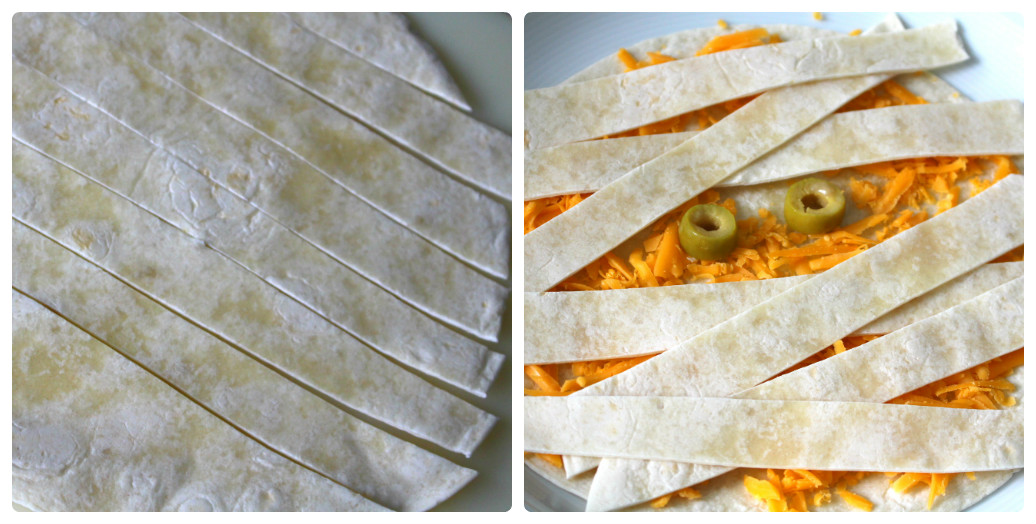
Para la momia cortamos una tortita en tiras. En la otra ponemos el queso y vamos colocando las tiras cruzandolas unas sobre otras, dejando un espacio libre para colocar unas rodajas de aceituna como si fuesen los ojos de la momia.

Calentamos un minuto al microondas y listo!


For the mummy slice one of the tortillas in strips. Then sprinkle the cheese on the other one and set the strips on top crossing each other. Leave a small space in the center to place 2 slices of olive as if they were the mommie’s eyes!

Heat 1 minute in the microwave and it’s ready!


Victoria♥

Tarjeta de Cumpleaños #2 / Birthday Card #2

candle4

Hola! Hoy os traigo otro DIY para una felicitación de cumpleaños.

Hey! Today I share a DIY to make a lovely birthday card.

Para esta tarjetita vais a necesitar:


  • Una cartulina A4 (yo escogí blanca pero podéis usar cualquier color)
  • Un trozo de cartulina amarilla
  • Un trozo de cordón o de lazo
  • Lápiz
  • Boli
  • Tijeras
  • Pegamento
  • Washitape

For this pretty card you will need:

  • A A4 cardboard (I used white but you can choose other colours)
  • A piece of orange cardboard
  • A piece of string
  • A pencil
  • A pen
  • A pair of scissors
  • Some glue
  • Washi tape

candle1

Lo primero es doblar la cartulina por la mitad. Después vamos cortando, con la mano, trazos de washitape de unos 5 o 6 centímetros. Las pegamos una al lado de la otra de manera algo desordenada, sin que estén perfectamente rectas y alineadas.

Start by folding the cardboard by half. Then with your hands tear off some washi tape pieces of about 5-6 cm. Stick them one next to the other in messy way. You don’t want them to be perfectly arranged.
candle2
En la cartulina amarilla dibujamos y recortamos unas llamitas. A continuación dibujamos las mechas de las velas y pegamos encima de cada una llama.
Por ultimo escribimos nuestro mensaje, atamos una lazada con nuestro cordel y listo!

Draw and cut out some little flames on the yellow cardboard. Then draw the candle’s wick and stick a flame on each of them.
Finish your card by writing your special message and tying a knot with your piece of string!

candle3
Espero que os haya gustado!
Gracias por leerme
Victoria ♥

Hope you liked it!
Thanks for stopping by
Victoria 

Tarjeta de cumpleaños #1 / Birthday Card #1

cupcakecard5.jpg

Hola! Hoy os traigo un DIY de una tarjeta de cumpleaños. Resulta que en febrero me coinciden varios cumpleaños incluido el mío! Así que he pensado que estaría bien compartir con vosotros las felicitaciones que voy a mandar y alguna cosita más.

Hey guys! Today I have a DIY for you. It is a very original birthday card. For some reason February is a month with quite a lot of birthdays for me (including mine!) so I thought it will be a good idea to share with you some birthday cards and other birthday things. Enjoy!

Para esta original tarjeta vais a necesitar:

  • Una cartulina A4 (yo escogí blanca pero podéis usar cualquier color)
  • Un trozo de cartulina marrón
  • Un trozo de cartulina amarilla
  • Un trozo de cartulina naranja
  • Una capsula de papel para cupcake
  • Una velita
  • Un trozo de cordón o de lazo
  • Lápiz
  • Tijeras
  • Pegamento

For this card you will need:

  • A A4 cardboard (I used white but you can choose other colours)
  • A piece of brown cardboard
  • A piece of yellow cardboard
  • A piece of orange cardboard
  • A paper case for cupcakes
  • A little candle
  • A piece of string
  • A pencil
  • A pair of scissors
  • Some glue

cupcakecard4.jpg
Lo primero es doblar la cartulina A4 por la mitad. Después toca cortar la capsula de cupcake. Le cortamos la base y recortamos dos trozos alargados.
Pegaremos estos trozos en la parte de abajo de nuestra tarjeta, dejando el borde superior sin pegamento para poder meter nuestra «cupcake».

First fold by half the A4 cardboard to make our birthday card. Then start by cutting of the base of you cupcake tin. Continue by cutting two rectangular pieces.
Glue them to the lower part of the card, leaving the top side with out glue so that you can insert your «cupcake» later.

cupcakecard1.jpg
Para la cupcake cortamos una especie de «luna» en nuestra cartulina marrón. La pegamos para que parezca que sale de la capsula de papel.

For the cupcake, cut out a piece of brown cardboard in the shape of a moon. Stick it on the card so that it looks it’s coming out of the cupcake case.
cupcakecard3.jpg
Hacemos 2 agujeritos en el centro de la tarjeta. Pasamos el cordón por ambos y atamos la velita con una lazada fuerte.

Pierce 2 little holes in the middle of the card. Pass your string through them and tie the candle with a strong knot.
cupcakecard2.jpg
Para la llama cortamos una llamita en la cartulina amarilla y una más pequeña en la cartulina naranja.
Las pegamos una encima de la otra sobre la mecha de la vela.

For the flame, cut two flame shapes. A bigger one from the yellow cardboard and a smaller one from the orange one. Stick them, one on top of the other, above the candle mesh.

Solo queda escribir W-I-S-H y añadir nuestro mensaje en el interior de la tarjeta.

All you need to do now is to write W-I-S-H and add you own message inside the card.

Espero que os haya gustado
Gracias por leerme
Victoria ♥

Hope you liked it!
Thanks for stopping by
Victoria

Cookies en un bote / Cookies in a jar

SONY DSC

Hola a todos y feliz 2015!! Espero que hayáis empezado el año con buen pie rodeados de vuestras familias y amigos. En el resto del mundo ya se acaban las fiestas navideñas, pero a nosotros todavía nos falta que vengan los Reyes Magos!

Os traigo una idea de regalo original , un detalle muy dulce válido para cualquier ocasión: cookies en un bote!

SONY DSC

Hello everybody and happy New Year!! I hope you’ve started this new year in a wonderful way surrounded by you loved ones. Almost everywhere in the world Christmas is over. But here in Spain we still have some thing really special happening in a few days, the arrival of the three wise men!

Here is a little idea for a very original gift, a sweet treat that will surely make someone smile: cookies in a jar!

La idea es del blog de Alma Obregón, para ella necesitareis:

  • Un bote de cristal de 425 ml
  • 150 gr de harina tamizada con ½ cucharadita de levadura
  • 75 gr de azúcar
  • 80 gr de azúcar moreno
  • 100gr de pepitas de chocolate
  • la etiqueta imprimible que encontrareis pinchando aqui
  • una cuerdita/lazo

The idea comes from Alma Obregon’s blog, you will need:

  • a jar of 425ml
  • 150 gr of flour with ½ tsp of baking powder
  • 75 gr of white sugar
  • 80 gr of brown sugar
  • 100 gr chocolate chips
  • the tag you will find clicking here
  • a piece of string

SONY DSC

Aseguraros de que el bote este limpio y súper seco! El orden de los ingredientes no importa demasiado, podéis ponerlos como queráis. Yo empecé por la harina, después el azúcar moreno, luego el azúcar normal y por ultimo las pepitas de chocolate.

Imprimir y recortar la etiqueta con las instrucciones, doblarla por la mitad y hacerle un agujerito para pasar la cuerdita. Atarla alrededor de la tapa del bote. Y listo!

Si os apetece podéis cambiar las pepitas de chocolate negro, por chocolate blanco o incluso por smarties o lacasitos.

 SONY DSC

Check that your jar is clean and absolutely dry. Put the dry ingredients in, the order doesn’t really matter. I started with the flour, then Brown sugar, the white sugar and finally the chocolate chips.

Print and cut the label with the instructions, fold it and make a small hole to pass the string and then tie it to the jar.

If you want you can change the chocolate chips for white chocolate, or even smarties.

SONY DSCEspero que os haya gustado!

Victoria ♥

Hope you liked it!

Victoria

Christmas Cupcakes #3 / Cupcakes de Navidad #3

corona1.jpg

Hola de nuevo! Espero que estéis pasando unas buenas Navidades! Hoy os traigo una última idea para decorar cupcakes: una corona de Navidad.

Hey again! Hope you are spending a wonderful holiday! Today I bring you one last idea for decorating your cupcakes: a Christmas wreath!

Vais a necesitas:

  • Icing marrón
  • Icing verde
  • Fondant rojo
  • Bolitas rojas (de fondant hechas en casa o de azúcar compradas)
  • Un biberón con boquilla de estrella
  • Un rodillo
  • Un utensilio para cortar fondant (o un cuchillo)

You will need:

  • Brown icing
  • Green icing
  • Red fondant
  • Red pearls (fondant homemade of made of sugar)
  • A piping bottle with a star nozzle
  • a rolling pin
  • A tool to cut fondant (can knife)

Empezamos cubriendo la cupcake con icing marrón, el mío era de chocolate. Después hacemos estrellas verdes en círculo apretando el biberón contra la cupcake y levantando suavemente.corona3.jpg

Start by spreading some brown icing on the cupcake, mine was chocolate.

Then with the green icing make a circle of stars by pressing the bottle against the cupcake and lifting carefully.

Para el lazo rojo vamos a empezar haciendo una culebrita y aplanándola con el rodillo. Después la cortamos en 4 partes iguales de unos 4-5 cm.

Dos del ellas van a ser las dos cintas que cuelgan. Para ellos cortamos en cada uno un pequeño triángulo.

Para la lazada, basta con dobla sobre si mismas las otras dos partes. Con un poco de agua las sellamos bien. Y luego las pegamos entre sí y con las cintas con otro poquito de agua.

Por últimos cortamos un rectángulo para simular el ‘nudo’ de la lazada y cubrir todo.

corona2.jpg

For the red ribbon start by making and spaghetti shape and flatten it the rolling pin. Cut it in 4 equal parts.

In two of them cut a little triangle. Then fold the other tow and stick the ends together with some water.

Stick the whole thing together with a little bit more water. Finish it up by making a little rectangle and stick it to cover everything up.

Por últimos colocamos el lazo en la cupcake y esparcimos algunas bolitas rojas cono si fuesen las bolitas del acebo.

corona4.jpg

Place the ribbon on the cupcake and sprinkle some red pearls on top of the green icing.

Espero que os haya gustado!

Victoria ♥

Hope you liked it!

Victoria

Christmas Cupcakes #2 / Cupcakes de Navidad #2

snowman2.jpg

Feliz Navidad!! Espero que paséis un día buenísimo con los vuestros! Hoy os traigo otra idea para decorar vuestras cupcakes de navidad!

Merry Christmas!! I hope you are having a great day with your friends and family!
I bring you an other idea to decorate your Christmas cupcakes!

Para esta cupcake de muñeco de nieve vais a necesitar:

  • Icing blanco
  • Un marshmallow
  • Fondant naranja
  • 3 bolitas verdes (de fondant o de azúcar)
  • Icing negro (teñir un poco del icing blanco que hagáis)
  • Una manga pastelera
  • Una boquilla redonda grande.
  • Un biberón con boquilla redonda muy finita.

For this snowman cupcakes you will need:

  • White icing
  • A marshmallow
  • Orange fondant
  • 3 little green pearls (made of fondant or sugar)
  • Black icing (dye some of the white icing you will be making)
  • One piping bag
  • One big round nozzle
  • One piping bottle with a very thin round nozzle

snowman1.jpgEmpezamos extendiendo un poco de icing hasta cubrir la cupcake. Después con la manga pastelera y la boquilla grande, hacemos una espiral que vaya subiendo hacia arriba con el icing blanco. Colocamos el marshmallow arriba y las 3 bolitas verdes como si fuesen los botones.

Start by spreading some icing on top of the cupcake. Then putt he icing in a piping bag and make a big swirl going up. On top of it place you marshmallow. Put 3 little green pearls as if they were three buttons.
Metemos icing negro en el biberón y hacemos los brazos trazando una línea hacia abajo y 3 palitos que serán los ‘dedos’. Para la boca hacemos puntitos en forma de sonrisa.

snowman3.jpg

Para la nariz cogemos un trocito de fondant naranja y le damos forma de cono. Con un cuchillo hacemos unas líneas presionando para imitar la zanahoria. Con un poco de agua la pegamos al marshmallow.

Por ultimo hacemos los ojos con el icing negro.

Put the black icing into the piping bottle and draw each arm by making a long line and then three little lines for the fingers. For the mouth, make little dots in the shape of a smile.

For the nose, use some orange fondant and make a cone, then with a knife press some line son it as if it was a carrot. With a little bit water, stick it on the marshmallow.

Finish it up by making the little black eyes.

snowman4.jpg

Pasar un buen dia!

Victoria ♥

Have a great day!

Victoria ♥

Christmas Cupcakes #1 / Cupcakes de Navidad #1

tree1.jpg

Hola chicos! Como no podía faltar os traigo ideas para decorar unas cupcakes especial navidad! Os iré enseñando diferentes diseños.

Hey guys! I couldn’t miss this opportunity of sharing with you some Christmas decorated cupcakes! I will be showing you different designs.

Para esta cupcakes de árbol de navidad vais a necesitar:

  • Una fresa
  • Icing verde
  • Icing marrón
  • Bolitas de colores (pueden ser he has a mano con fondant o compradas de azúcar)
  • Una estrellita (de fondant o comprada de azúcar)
  • Manga pastelera con boquilla de estrella (yo usé Wilton nº 21).

For this Christmas tree cupcake you will need:

  • A strawberry
  • Green icing
  • Brown icing
  • Little colour pearl (homemade made of fondant or of sugar from a store)
  • A little star (fondant or sugar)
  • Piping bag with a star nozzle (I used Wilton nº 21).

SONY DSC
Empezamos extendiendo un poco de icing marrón (el mío era de chocolate) para tapar la cupcakes.
Después cortamos lo verde de una fresa y la colocamos en medio de la cupcake.

First spread some brown icing (mine was chocolate) on the cupcake until covered.
Then cut the leaves of a strawberry and place it on the middle of the cupcake.
tree2.jpg
Ahora le toca al icing verde. Con una manga pastelera, empezando por abajo, vamos apretando y levantando para hacer pequeñas estrellitas. Poco a poco cubrimos toda la fresa. Colocamos las bolitas que queramos, que serán los adornos del árbol y por ultimo con cuidado lo coronamos con una estrellita.

Now is the turn of the green icing. Using a piping bag, start by the bottom and create little starts by pressing on the piping bag and then lifting it. Slowly cover the whole strawberry. Then place as many little pearls as you want, these will be the ornaments of your Christmas tree. Finally stick the little star on the top of the tree.
tree3.jpg
Espero que paséis una feliz noche con vuestra familia y amigos!
Mañana más!
Victoria  ♥

Hope you have a wonderful night with your family and friends!
See you tomorrow!
Victoria ♥

Tarjetas de Navidad / Christmas Cards

card4.jpg

Hola! En esta época del año, que toca felicitar y desear lo mejor a nuestros amigos y familiares, se me ha ocurrido enseñaros unas muy fáciles y originales tarjetas navideñas.

Hey guys! At this time of the year, when you need to wish a great holiday to our friends and family, I thought it would be a nice idea to share with you some very easy and creative Christmas cards’ designs.

Vais a necesitar:

  • Cartulinas A4 de diferentes colores
  • Lápiz y goma
  • Tijeras
  • Pegamento
  • Un rotulador metalizado
  • Vuestros washitapes favoritos!

You will need

  • A4 cardboard of different colours
  • Pencil and eraser
  • A pair of scissors
  • Some glue
  • A silver marker
  • Your favourite washitapes!

Tarjeta con árbol de navidad

Doblamos una de las cartulinas por la mitad. Cortamos un trozo bastante largo de washitape y lo pegamos horizontalmente en la mitad inferior de primera cara de la cartulina. Vamos cortando trozos de washitape cada vez mas cortos y los pegamos encima del anterior dejando un espacio muy pequeñito.

Por último cortamos un trocito de washitape y lo colocamos abajo, verticalmente, imitando el tronco del pino.

Podéis ir cambiando de washitape como he hecho yo. Y si no tenéis washi tapes navideños no pasa nada!! Con los que tengáis por casa puede quedar igual de bonito!

card1.jpg

Christmas tree card

Fold in half one A4 cardboard. The cut a piece of washitape and stick it on the lower part of the folded card. Then keep cutting shorter and shorter pieces and stick them on top of the previous ones, leaving a very small gap between them.

Last, cut a small piece and stick it vertically under the tree, as if it was the trunck. You can switch washitape colours as I did. And if you don’t have Christmas washitape don’t panic! Whichever you have will look beautiful!

card5.jpg

Tarjeta bola de Navidad

Para este diseño vamos a necesitar un trozo de cartulina extra. En ese trozo vamos a dibujar un circulo y a recortarlo. Después empezaremos a forrar el circulo con distintos washitapes, doblando los bordes que nos sobren hacia dentro (procurar que sobre poquito).

Cuando la tengamos, la pegamos bien en una cartulina que habremos doblado por la mitad.

A continuación dibujamos el enganche, un pequeño lazo y una línea hacia arriba para que parezca que esta colgando.

Podéis añadir un mensaje escrito debajo si queréis!

card2.jpg

For this design you will need an extra piece of cardboard. In that piece draw a circle and cut it. Then start covering the circle with your different washitapes and fold the remaining tape backward.

Once ready, stick it wit some glue to the folded A4 cardboard.

After that, draw a clasp, a little bow and a line as if it was hanging from it.

Add a message underneath it if you want!

card3.jpg

Espero que os hayan gustado!

Victoria ♥

Hope you liked them!

Victoria ♥

Decoración para Tarta – Happy Birthday – Cake Topper

topper1.jpg

Hola chicos! Pues aquí os voy a enseñar como hacer el topper de ‘Happy Birthday’ que decoraba la tarta de chocolate que subí hace un par de días.

Hey guys! Today I bring you the DIY tutorial of the cake topper I used for my chocolate pie a few days ago.

Vais a necesitar:

  • Letras impresas (link abajo)
  • Cordel
  • 2 pajitas
  • tijeras
  • pegamento de barra
  • pegamento liquido

You will need:

  • Printed letters (link below)
  • String
  • 2 straws
  • a pair of scissors
  • Stick glue
  • Liquid glue


Las letras las tenéis que imprimir, clicar aquí para el link, la idea viene del blog ‘La Fiesta de Olivia’. Pensar que hay que imprimir dos veces el alfabeto porque vamos a necesitar algunas letras dos veces.

Una vez las tengáis impresas, recortar las que vayáis a usar en este caso ‘ H-A-P-P-Y-B-I-R-T-H-D-A-Y’.

You first need to print the letters. Here is the link, the idea comes from a blog called ‘La Fiesta de Olivia’. Thinks that you will need more tan on copy because you are going to need some letters twice. Once you have them, cut the ones you will need, in this case: ‘H-A-P-P-Y-B-I-R-T-H-D-A-Y’.topper2.jpg

Ahora hay que doblar por la mitad las banderitas de las letras y pegar ambas partes, dejando un trocito, por donde doblamos, sin pegamento para que luego pase el cordel.

Now you need to fold the letters in half and glue the two half together (with the glue stick) leaving the centre with no glue so that you are able to pass the string through them later.

Cortamos dos trozos de cordel, uno más largo que el otro. En el más corto vamos pasando las letras de ‘HAPPY’ y en el largo las letras de ‘BIRTHDAY’.

Cut two pieces of string, one longer than the other. Pass the short one through the letters H-A-P-P-Y and the long one through the letters B-I-R-T-H-D-A-Y.

 topper3.jpg

Con cuidado atamos los cordeles a las pajitas y aseguramos el nudo con una gota de pegamento liquido. Cortamos lo que nos sobra en los extremos y listo!

Este topper es perfecto para decorar cualquier tipo de tartas y podéis poner el mensaje que queráis utilizando otras letras.

Carefully tie the ends of the strings to the straws and secure the knots with a drop of liquid glue. Cut the excess of string and that it!

This cake topper is perfect for decorating any sort of cake and you can use it for different occasions using other letter combinations.

Chocolate6.jpg

Espero que os haya gustado!

Victoria ♥

hope you liked it!

Victoria ♥

Calabaza de Halloween / Jack-O’Lantern

SONY DSC

No se puede celebrar Halloween sin una calabaza! En este post os voy a enseñar lo fácil que es vaciar vuestra propia calabaza en casa!

You can’t celebrate Halloween without a pumpkin! On this post I’m going to show you how to carve your own pumpkin for a perfect Halloween!

Necesitaréis:

  • una calabaza
  • un rotulador, mejor permanente
  • un cuchillo grande, bien afilado
  • un cuchillo pequeño
  • un utensilio para hacer bolitas de melón o para hacer bolas de helado
  • una velita

You will need:

  • a pumpkin
  • a marker, better if it’s permanent
  • a sharp knife
  • an ice-cream scoop
  • a tea light

SONY DSC

Empezamos dibujando un circulo en la parte superior y la cara que queramos en uno de los lados de nuestra calabaza. Sabed que si añadís muchos detalles será más complicado cortarlo después.

Start by drawing a circle on the top and a face for the pumpkin on one of its sides. Know that if you include lots of details it will be harder to cut them of later on.

toppumpkin.jpg

Con la ayuda de un cuchillo cortamos el circulo que será la tapa. El cuchillo debe de introducirse inclinado y no recto desde arriba. Queremos conseguir una tapa que tenga forma de cono por debajo, así será más fácil sacarla y luego no se nos meterá hacia dentro.

With a knife, cut the circle, that will be the lid. The knife needs to be introduced at an angle, not straight from the top. That way our lid will be cone-shaped and it will be easier to get out and will fit in perfectly.

insidepumpkin.jpg

Ahora hay que vaciar por completo la calabaza, sacando primero las semillas y luego la carne de las paredes. ¡No tiréis nada! Las semillas se pueden tostar y tengo algo especial preparado en el post de mañana para la carne de la calabaza!

Now you need to scoop out first the seeds and then the pumpkin flesh. Do not throw anything away! You can toast the seeds in the oven and I have a very special post for tomorrow where we will be using the pumpkin flesh.

inside2.jpg

Ahora con cuidado cortamos los ojos, nariz y boca.

Carefully cut out the mouth, eyes and nose of your pumpkin.

eyesmouth.jpg

Le pasamos un trapo por encima para limpiarla y que no esté pegajosa y metemos una velita dentro.

Clean it with a cloth so that it is not sticky, then put a tea light inside.

Ya tenéis vuestra calabaza! Podéis guardar la carne de la calabaza en un bol cubierto de papel film en la nevera durante 48 horas.

Your pumpkin is now ready!! You can keep the pumpkin chunks in a covered bowl in your fridge for about 48 hours.

halloweentomorrow

Gracias por leerme

Victoria ♥

Thanks for reading

Victoria ♥