Tarjeta de Cumpleaños #2 / Birthday Card #2

candle4

Hola! Hoy os traigo otro DIY para una felicitación de cumpleaños.

Hey! Today I share a DIY to make a lovely birthday card.

Para esta tarjetita vais a necesitar:


  • Una cartulina A4 (yo escogí blanca pero podéis usar cualquier color)
  • Un trozo de cartulina amarilla
  • Un trozo de cordón o de lazo
  • Lápiz
  • Boli
  • Tijeras
  • Pegamento
  • Washitape

For this pretty card you will need:

  • A A4 cardboard (I used white but you can choose other colours)
  • A piece of orange cardboard
  • A piece of string
  • A pencil
  • A pen
  • A pair of scissors
  • Some glue
  • Washi tape

candle1

Lo primero es doblar la cartulina por la mitad. Después vamos cortando, con la mano, trazos de washitape de unos 5 o 6 centímetros. Las pegamos una al lado de la otra de manera algo desordenada, sin que estén perfectamente rectas y alineadas.

Start by folding the cardboard by half. Then with your hands tear off some washi tape pieces of about 5-6 cm. Stick them one next to the other in messy way. You don’t want them to be perfectly arranged.
candle2
En la cartulina amarilla dibujamos y recortamos unas llamitas. A continuación dibujamos las mechas de las velas y pegamos encima de cada una llama.
Por ultimo escribimos nuestro mensaje, atamos una lazada con nuestro cordel y listo!

Draw and cut out some little flames on the yellow cardboard. Then draw the candle’s wick and stick a flame on each of them.
Finish your card by writing your special message and tying a knot with your piece of string!

candle3
Espero que os haya gustado!
Gracias por leerme
Victoria ♥

Hope you liked it!
Thanks for stopping by
Victoria 

Tarta de Zanahoria / Carrot Cake

carrotc5.jpg

Hola a todos! Hoy os traigo una entrada especial: mi tarta de cumpleaños! Me encanta la tarta de zanahoria y aprovechando que mi familia vino a cenar a casa decidí hacerla. Todo un éxito.

Hey guys! Today I share with you a special recipe for a special occasion: my birthday!
I really like carrot cake and haven’t had it in a while, so I thought I would bake it for my birthday dinner. And it was a blast!

La receta es del libro de Alma Obregón «Objetivo Tarta perfecta» y vais a necesitar:
-210 gr de harina
-3 huevos
-2 cucharaditas de levadura
-180 ml de aceite
-2 cucharaditas de canela
-225 gr de zanahorias ralladas
-210 gr de manzana rallada
-90 gr de pasas
-180 gr de azúcar
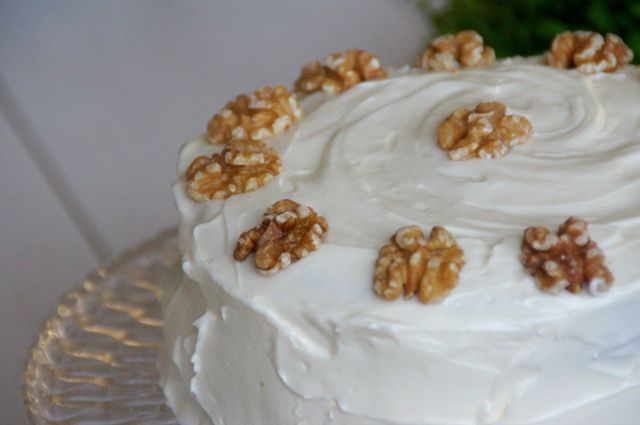
-Un buen puñado de nueces picadas + alguna para decorar
Para la crema de queso:
-125 gr de mantequilla a temperatura ambiente
-300 gr de azúcar glass
-125 gr de philadelphia (no light!)
-3 cucharadas de leche

The recipe comes from a book by Alma Obregón called «Objetivo Tarta Perfecta» and you will need:

– 210 gr of flour
– 3 eggs
– 2 tsp of baking powder
– 180 ml of oil
– 2 tsp of cinnamon
– 225 gr of grated carrots
– 210 gr of grated apple
– 90 gr of raisins
– 180 gr of sugar
– A good handful of nuts

For the cheese frosting:
-125 gr of butter at room temperature
-300 gr of icing sugar
-125 gr of cream cheese (can’t be light)
-2 tbs of milk

carrotc3.jpg
Empezamos precalentando el horno a 180 y engrasamos 2 moldes de 18 cm.
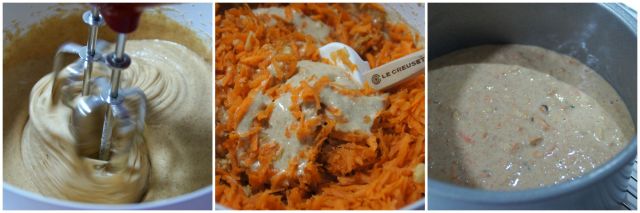
Tamizamos en un bol la harina, la levadura y la canela.
En otro bol, batimos los huevos, el azúcar y el aceite. Incorporamos la harina y ,una vez integrada, añadimos la zanahoria y la manzana rallada.
Por ultimo añadimos las pasas y las nueces.
Pesamos la mezcla y la repartimos en los moldes.

Start by preheating your oven at 180 and grease two 18 cm cake tins.
In a bowl sift the flour, cinnamon and baking powder together.
In another bowl beat the eggs, oil, and sugar. Add the flour and once mixed add the grated carrots and apples.
Lastly put in the raisins and pecans.
Weight the batter and divide between tins.

carrotc.jpg

Horneamos durante 25-30 minutos o hasta que al pincharlo, el palillo salga limpio.
Una vez fuera del horno los dejamos reposar 5 minutos y los traspasamos a una rejilla para que se enfríen.

Bake for 25-30 minutes or until a toothpick comes out clean.
Once out of the oven, let the cakes rest for 5 minutes and then let them cool on a rack.

Para la crema batimos la mantequilla, la leche y el azúcar glass a máxima velocidad hasta tener una crema blanca y suave (unos 5 minutos). Añadimos el queso (que tiene que estar frio!!) y batimos aumentando la velocidad poco a poco hasta que esté homogénea y cremosa.

For the frosting beat the butter, milk and icing sugar together for 5 minutes until white and fluffy. Then add the cream cheese (it needs to be cold!!) and beat in until fully incorporated. Your frosting needs to be light and creamy.

carrotc2.jpg

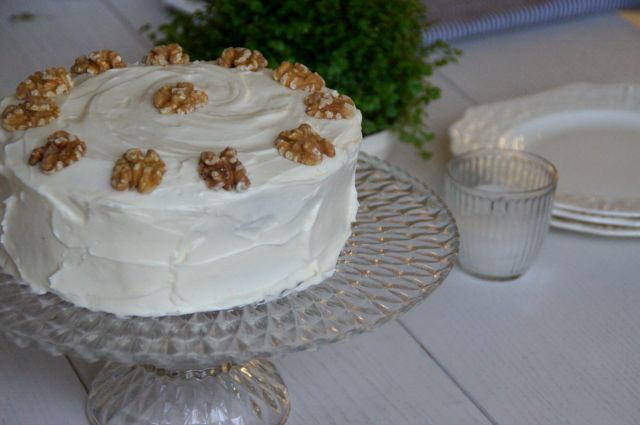
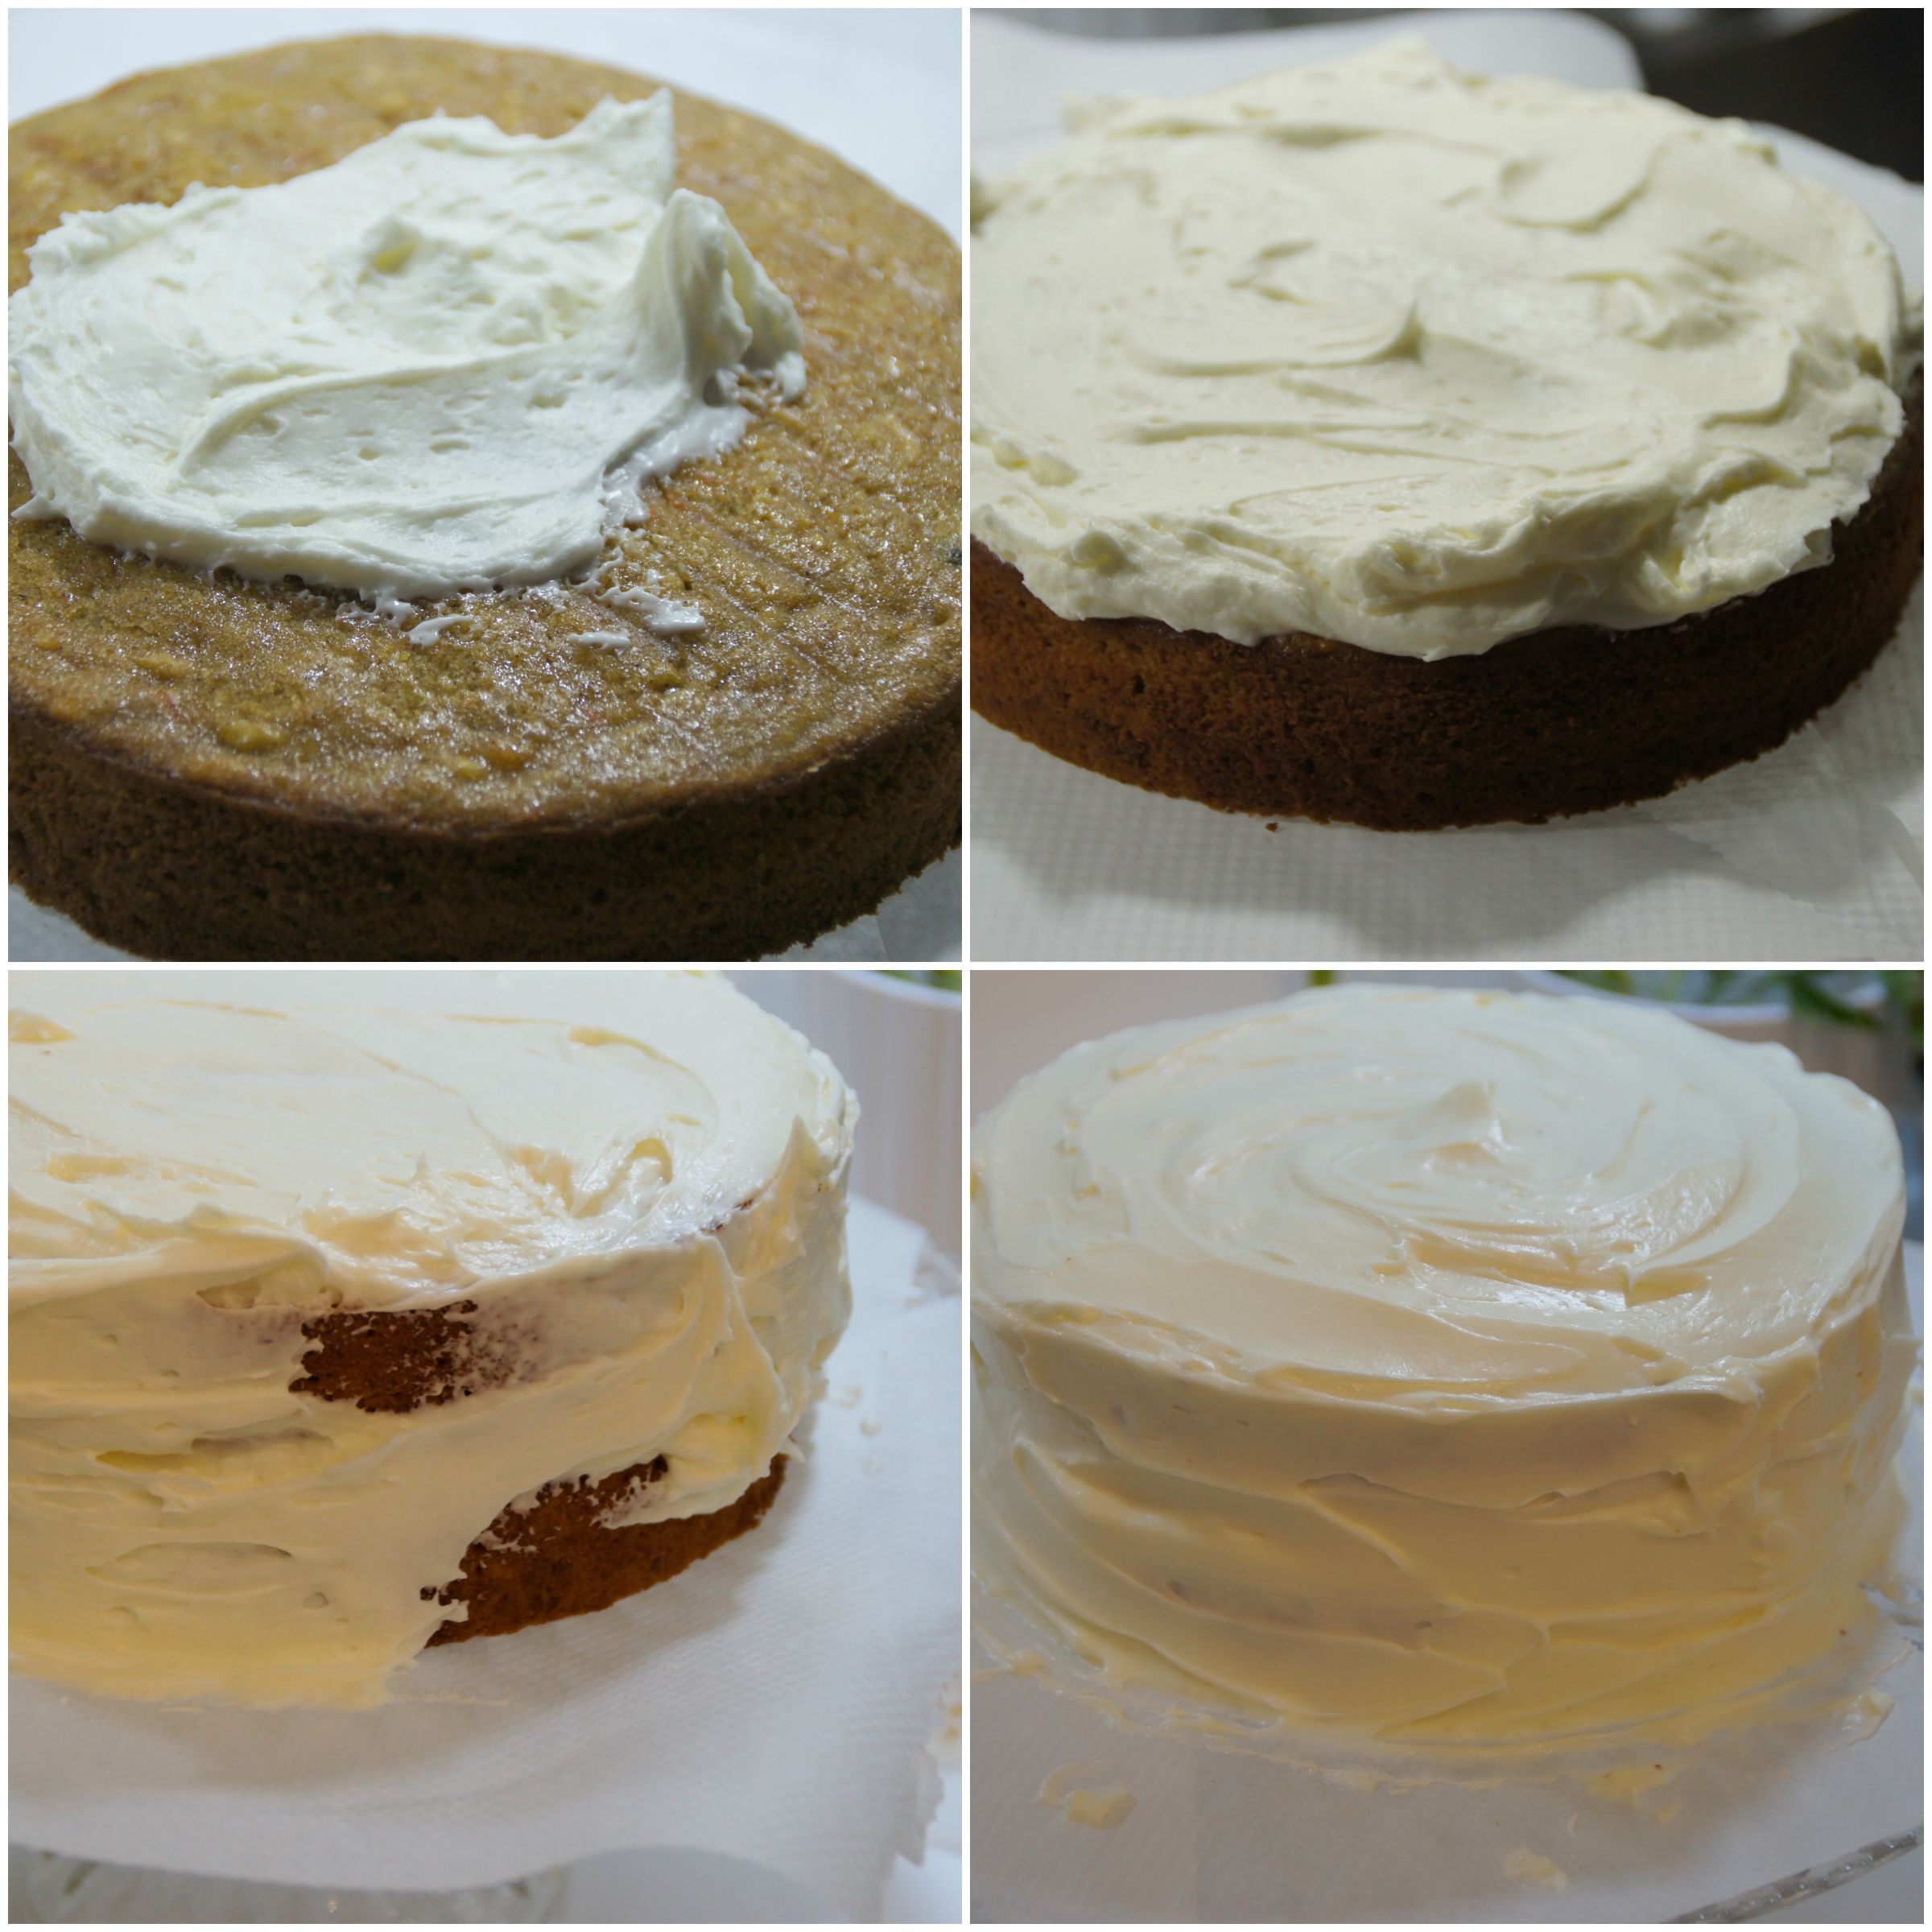
Montamos la tarta untando una capa de crema entre los dos bizcochos y cubriéndolo todo con la crema restante. Decoramos con unas nueces.

Put the cake together by spreading some cream cheese frosting in between the two cakes and them covering the whole thing with the remaining frosting. Decorate with some nuts.

Espero que os haya gustado!

Victoria ♥

Hope you liked it!

Victoria

carrotc4.jpg

Tarjeta de cumpleaños #1 / Birthday Card #1

cupcakecard5.jpg

Hola! Hoy os traigo un DIY de una tarjeta de cumpleaños. Resulta que en febrero me coinciden varios cumpleaños incluido el mío! Así que he pensado que estaría bien compartir con vosotros las felicitaciones que voy a mandar y alguna cosita más.

Hey guys! Today I have a DIY for you. It is a very original birthday card. For some reason February is a month with quite a lot of birthdays for me (including mine!) so I thought it will be a good idea to share with you some birthday cards and other birthday things. Enjoy!

Para esta original tarjeta vais a necesitar:

  • Una cartulina A4 (yo escogí blanca pero podéis usar cualquier color)
  • Un trozo de cartulina marrón
  • Un trozo de cartulina amarilla
  • Un trozo de cartulina naranja
  • Una capsula de papel para cupcake
  • Una velita
  • Un trozo de cordón o de lazo
  • Lápiz
  • Tijeras
  • Pegamento

For this card you will need:

  • A A4 cardboard (I used white but you can choose other colours)
  • A piece of brown cardboard
  • A piece of yellow cardboard
  • A piece of orange cardboard
  • A paper case for cupcakes
  • A little candle
  • A piece of string
  • A pencil
  • A pair of scissors
  • Some glue

cupcakecard4.jpg
Lo primero es doblar la cartulina A4 por la mitad. Después toca cortar la capsula de cupcake. Le cortamos la base y recortamos dos trozos alargados.
Pegaremos estos trozos en la parte de abajo de nuestra tarjeta, dejando el borde superior sin pegamento para poder meter nuestra «cupcake».

First fold by half the A4 cardboard to make our birthday card. Then start by cutting of the base of you cupcake tin. Continue by cutting two rectangular pieces.
Glue them to the lower part of the card, leaving the top side with out glue so that you can insert your «cupcake» later.

cupcakecard1.jpg
Para la cupcake cortamos una especie de «luna» en nuestra cartulina marrón. La pegamos para que parezca que sale de la capsula de papel.

For the cupcake, cut out a piece of brown cardboard in the shape of a moon. Stick it on the card so that it looks it’s coming out of the cupcake case.
cupcakecard3.jpg
Hacemos 2 agujeritos en el centro de la tarjeta. Pasamos el cordón por ambos y atamos la velita con una lazada fuerte.

Pierce 2 little holes in the middle of the card. Pass your string through them and tie the candle with a strong knot.
cupcakecard2.jpg
Para la llama cortamos una llamita en la cartulina amarilla y una más pequeña en la cartulina naranja.
Las pegamos una encima de la otra sobre la mecha de la vela.

For the flame, cut two flame shapes. A bigger one from the yellow cardboard and a smaller one from the orange one. Stick them, one on top of the other, above the candle mesh.

Solo queda escribir W-I-S-H y añadir nuestro mensaje en el interior de la tarjeta.

All you need to do now is to write W-I-S-H and add you own message inside the card.

Espero que os haya gustado
Gracias por leerme
Victoria ♥

Hope you liked it!
Thanks for stopping by
Victoria