Crêpes

crepes

Hola! Hoy os traigo una receta clásica francesa: crêpes! Son super fáciles de hacer y están buenísimas! La receta está adaptada del libro ‘Sucré’ de la famosa pastelería francesa La Durée.

Hey today I bring you a classic french recipe: crêpes! Very easy and very yummy! This recipe is inspired by the book ‘Sucré’ from the famous french luxury bakery La Durée.

Para unas 20 crêpes necesitáis:

  • 165 gr de harina de repostería
  • 40 gr de azúcar
  • 500 ml de leche entera
  • 4 huevos
  • 40 gramos de mantequilla derretida (+ una cucharadita para la sartén)
  • 1 cucharada de aceite
  • Nutella, mermelada, jamón y queso…

For about 20 crêpes you will need:

  • 165 gr of flour
  • 40 gr of sugar
  • 500 ml of whole milk
  • 4 eggs
  • 40 gr of melted butter (+ 1 tsp for the pan)
  • 1 tbsp of oil
  • Nutella, jam, ham and cheese…

crepes4

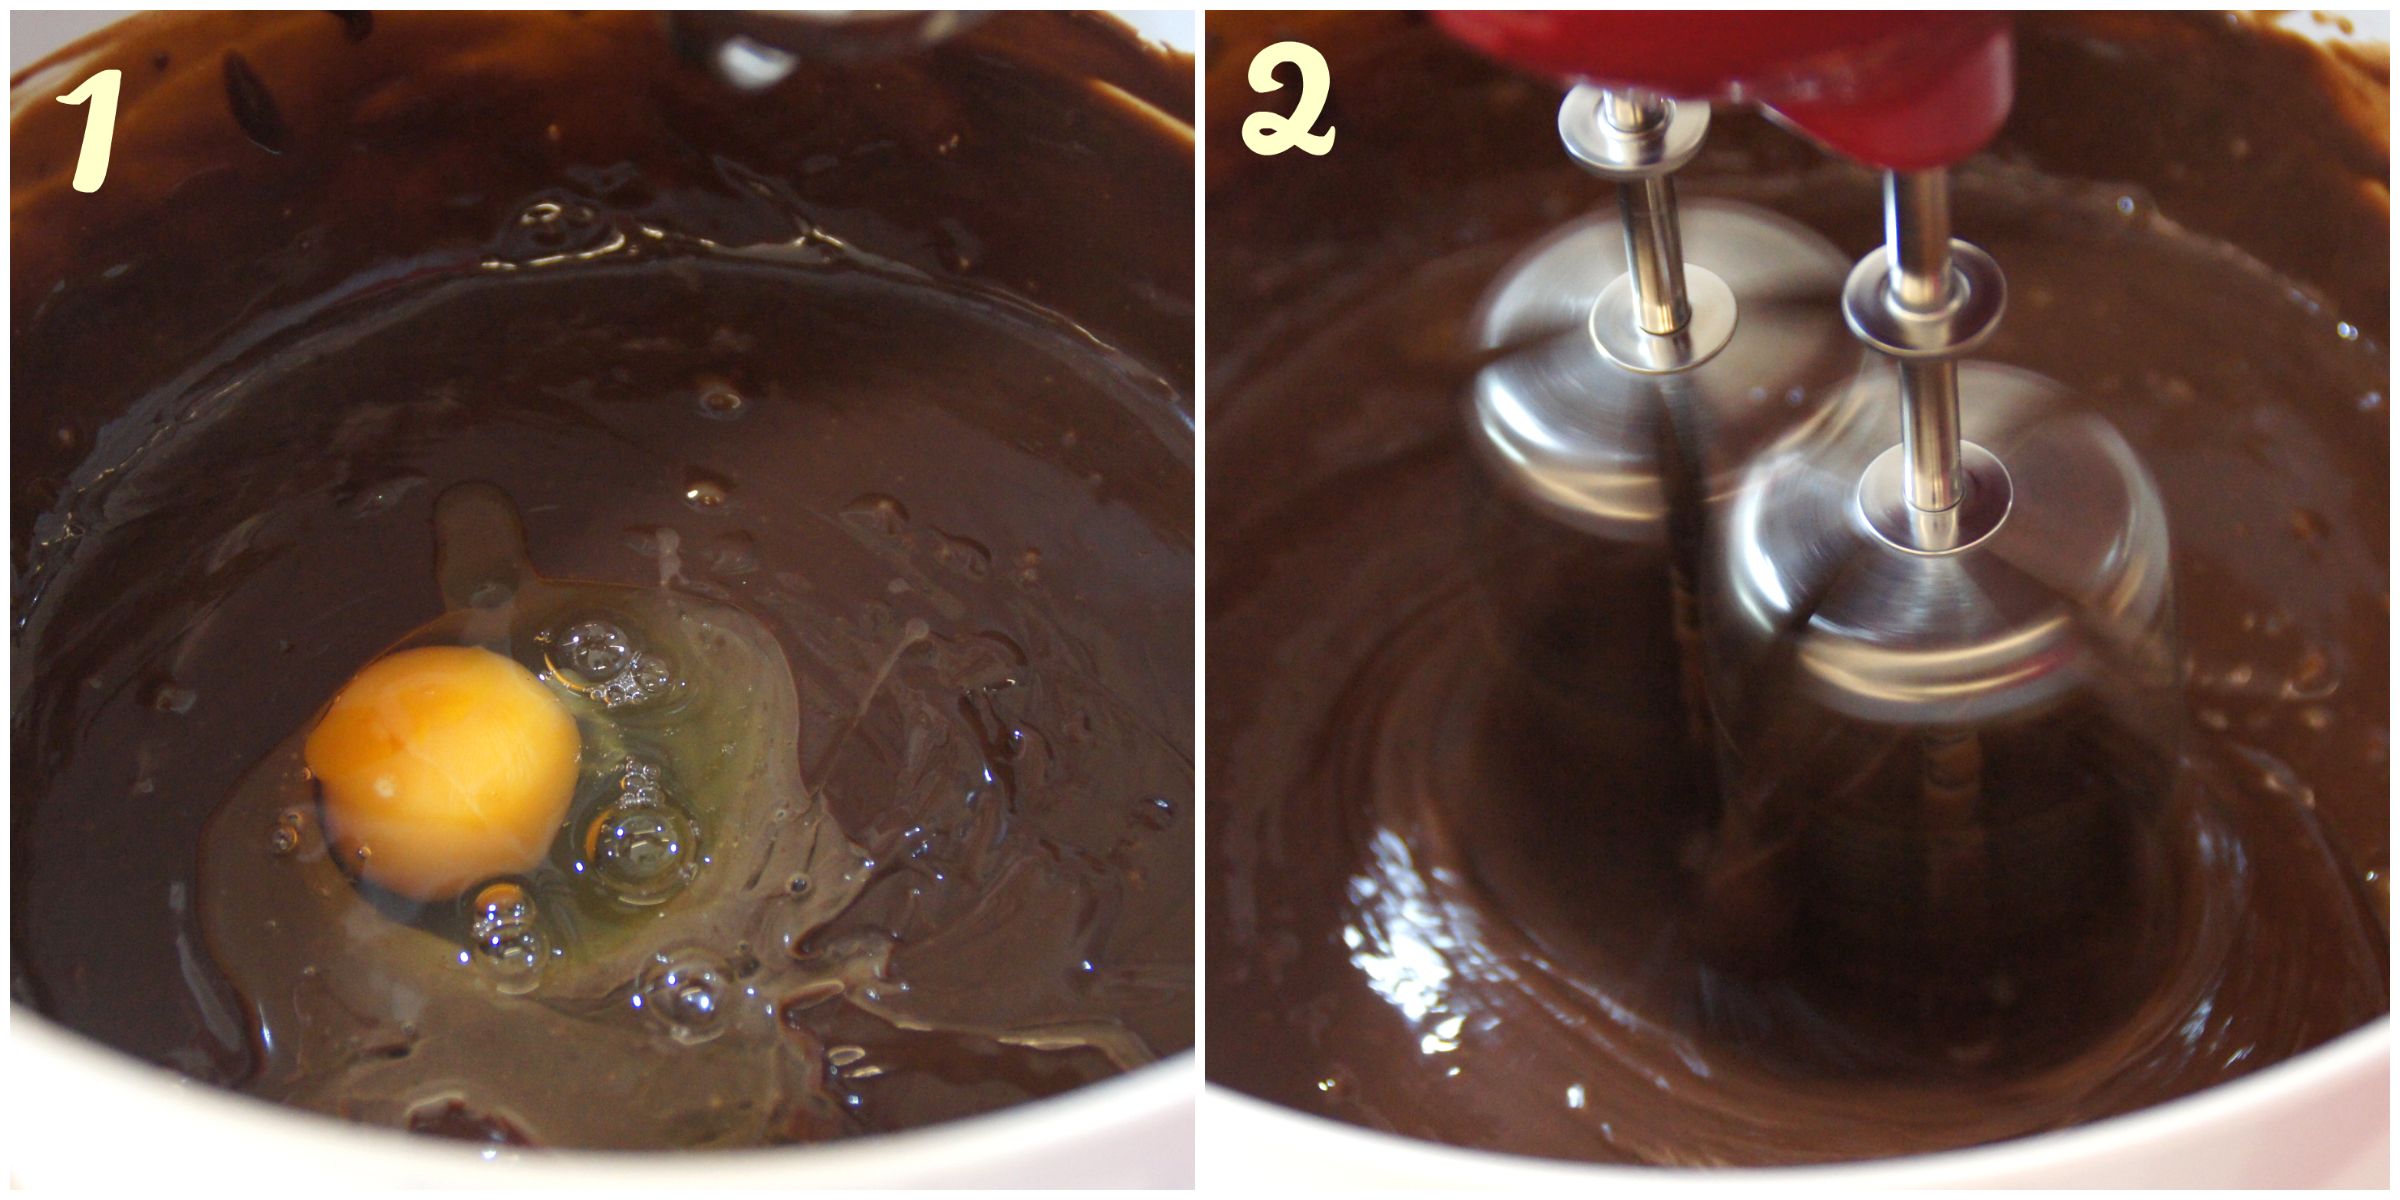
No vamos a utilizar batidora eléctrica para esta receta, usaremos una batidora manual de las de siempre.

Empezamos tamizando la harina en un bol. Añadimos el azúcar y los huevos y mezclamos. Incorporamos de forma gradual la leche sin dejar de remover en ningún momento. Cuando no nos queden grumos, añadimos la mantequilla derretida y el aceite.

Cubrimos el bol y dejamos reposar 1 hora.

crepes2

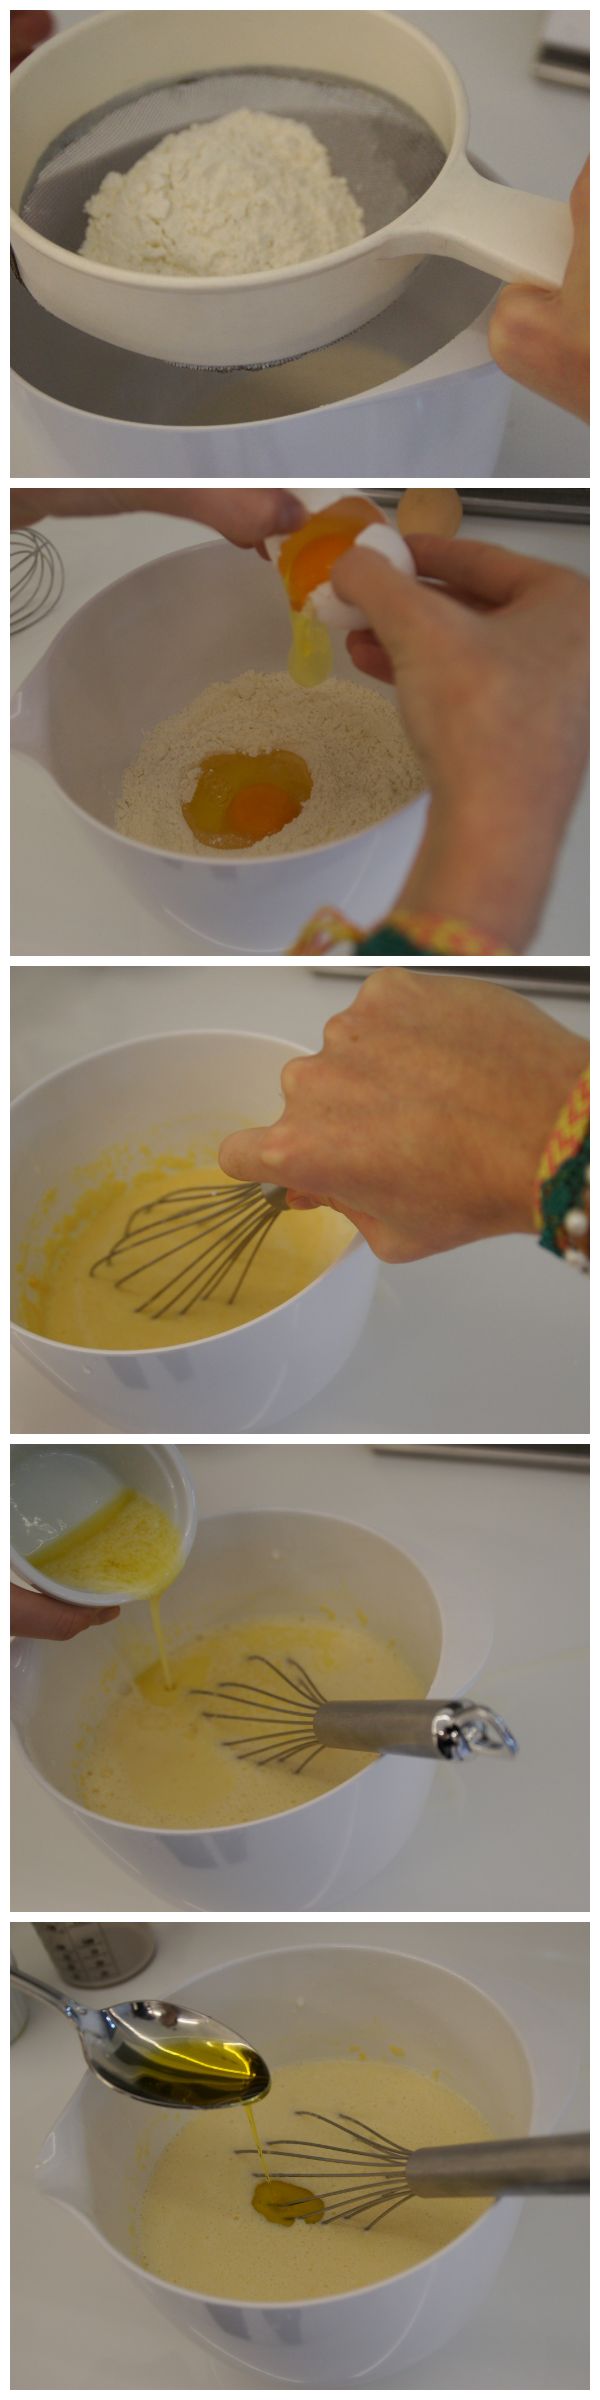
We are not going to use any electric beater for this recipe, we will mis everything by hand.

Start by sifting the flour in a bowl. Then add the sugar and the eggs and mix together. Gradually pour in the milk and mix non stop until lumps disappear. Mix in the melted butter and the oil.

Cover the bowl and let in stand for 1 hour.

Engrasa la sartén con un poquito de mantequilla y papel de cocina. Ponla a fuego medio-alto y con la ayuda de un cucharón vierte la masa. Inclina la sartén para que la masa se extienda bien y la crêpe quede uniforme. Al de aproximadamente un minuto le damos la vuelta a la crêpe con cuidado. Yo me suelo ayudar de un tenedor y una espátula de madera.

Cuando el otro lado se dore, poner la crêpe en un plato y repetir el proceso con el resto de la masa.

La primera crêpe suele salir siempre mal así que no cunda el pánico si veis que se os rompe o no se os dora bien, le pasa a todo el mundo!

crepes3

Spread a little bit o butter on the pan using a paper towel. At medium-high heat pour some dough in and tilt the pan so that the crêpe came out even. After a minute flip the crêpe over. I use a fork and a wooden spatula to do it.

When the other side is golden take it put and put it on a plate and repeat with the rest of the dough.

The first crêpe always turns out wrong, so don’t worry if it breaks or doesn’t cook well, it happens to everyone!!!

Servirlas con nutella, mermelada, azúcar y limón, jamón y queso…

Espero que os hayan gustado!

Victoria ♥

Serve with nutella, jam, sugar and lemon, ham and cheese…

Hope you liked them!
Victoria ♥

Decoración para Tarta – Happy Birthday – Cake Topper

topper1.jpg

Hola chicos! Pues aquí os voy a enseñar como hacer el topper de ‘Happy Birthday’ que decoraba la tarta de chocolate que subí hace un par de días.

Hey guys! Today I bring you the DIY tutorial of the cake topper I used for my chocolate pie a few days ago.

Vais a necesitar:

  • Letras impresas (link abajo)
  • Cordel
  • 2 pajitas
  • tijeras
  • pegamento de barra
  • pegamento liquido

You will need:

  • Printed letters (link below)
  • String
  • 2 straws
  • a pair of scissors
  • Stick glue
  • Liquid glue


Las letras las tenéis que imprimir, clicar aquí para el link, la idea viene del blog ‘La Fiesta de Olivia’. Pensar que hay que imprimir dos veces el alfabeto porque vamos a necesitar algunas letras dos veces.

Una vez las tengáis impresas, recortar las que vayáis a usar en este caso ‘ H-A-P-P-Y-B-I-R-T-H-D-A-Y’.

You first need to print the letters. Here is the link, the idea comes from a blog called ‘La Fiesta de Olivia’. Thinks that you will need more tan on copy because you are going to need some letters twice. Once you have them, cut the ones you will need, in this case: ‘H-A-P-P-Y-B-I-R-T-H-D-A-Y’.topper2.jpg

Ahora hay que doblar por la mitad las banderitas de las letras y pegar ambas partes, dejando un trocito, por donde doblamos, sin pegamento para que luego pase el cordel.

Now you need to fold the letters in half and glue the two half together (with the glue stick) leaving the centre with no glue so that you are able to pass the string through them later.

Cortamos dos trozos de cordel, uno más largo que el otro. En el más corto vamos pasando las letras de ‘HAPPY’ y en el largo las letras de ‘BIRTHDAY’.

Cut two pieces of string, one longer than the other. Pass the short one through the letters H-A-P-P-Y and the long one through the letters B-I-R-T-H-D-A-Y.

 topper3.jpg

Con cuidado atamos los cordeles a las pajitas y aseguramos el nudo con una gota de pegamento liquido. Cortamos lo que nos sobra en los extremos y listo!

Este topper es perfecto para decorar cualquier tipo de tartas y podéis poner el mensaje que queráis utilizando otras letras.

Carefully tie the ends of the strings to the straws and secure the knots with a drop of liquid glue. Cut the excess of string and that it!

This cake topper is perfect for decorating any sort of cake and you can use it for different occasions using other letter combinations.

Chocolate6.jpg

Espero que os haya gustado!

Victoria ♥

hope you liked it!

Victoria ♥

Tarta de Chocolate / Chocolate Pie

chocolate2.jpg

El fin de semana pasado fue el cumpleaños de dos amigas muy especiales, son de esas amigas que sabes que vas a guardar para toda la vida. A una de ellas tengo suerte de verla casi cada día, esta tarta fue para ella, pero la otra se me ha ido lejísimos, al otro lado del océano. Este post va dedicado a las dos, por ser tan buenas amigas y estar siempre ahí cuando las necesito.

Last weekend two very special friends celebrated their birthday, the type of friends you know you are going to keep forever. I’m lucky to see one of them almost everyday, but the other one has gone far away, across the ocean. This post goes to both of them, thank you for being such good friends and being always there for me. 

Para esta tarta de chocolate vais a necesitar:

150 gr de chocolate negro

150 gr de chocolate con leche

200 ml de nata

3 huevos

Para la masa:

50 gr de azúcar glas

un huevo

una cucharadita de esencia de vainilla

30 gr almendra molida

125 gr de mantequilla

250 gr de harina

For this Chocolate Pie you are going to need

150 gr of dark chocolate

150 gr of milk chocolate

200 ml of cream

3 eggs

Fort he pie crust:

50 gr of icing sugar

one egg

one tsp of vanilla essence

30 gr grounded almond

125 gr of butter

250 gr of flour

chocolate5.jpg

Empezamos mezclando en un bol la mantequilla, el huevo, el azúcar glas, la vainilla y la almendra en polvo hasta que sea una mezcla homogénea. Después poco a poco añadimos la harina y hacemos una bola con la masa. Metemos a la nevera 20 minutos.

Start by mixing the butter, the egg, icing sugar, vanilla essence, and grounded almond, until well combined. Then, little by little, pour in the flour and mix until forming a ball of dough. Put in the fridge for 20 minutes.

masa1.jpg

Precalentamos el horno a 180ºC.

En una cazuela calentamos la nata y en cuando empiece a hervir, la vertemos sobre todo el chocolate que habremos partido un onzas en un bol. Removemos hasta que se derrita por completo. Después añadimos los huevos uno a uno.


Preheat your oven at 180ºC.

In a small sauce pan heat up the cream, and as soon as it starts boiling, pour it on top of the chocolate that you will have chopped in pieces and put in a bowl. Blend together until the chocolate has completely melted. Then add the eggs one at a time and mix well.

chocolate1.jpg

Forramos un molde de silicona con papel de horno y untamos un poquito de mantequilla en los bordes.

Sacamos la masa de la nevera y un una superficie bien enharinada la extendemos con un rodillo y la colocamos en el molde. Apretamos bien con los dedos para que se pegue a los bordes. La pinchamos con un tenedor varias veces y la metemos al horno, 13 minutos hasta que coja un color blanquecino.

Line a silicone mould with some baking paper and spread a little bit of butter on the sides.

Take the dough out of the fridge and, on a floured surface, roll it using a rolling pin, then place it on the mould. Press it with your fingers so that it sticks well to the sides. Using a fork, pierce the dough several times, and then bake it for 13 minutes until it whitens.

masa2.jpg

Sacamos la masa del horno y vertemos la mezcla de chocolate dentro. Horneamos durante 25-30 minutos hasta que esté cuajada. Esperar hasta que se enfrié para comer.

Take it out of the oven and pour in the chocolate mixture. Bake for another 25-30 minutes until set. Wait for it to cool down before serving.

chocolate4.jpg

En el próximo post os enseñaré como hacer el topper con las letras de ‘Happy Birthday’!

Espero que os haya gustado!
Victoria ♥

On the next post I will show you how to make the ‘Happy Birthday’ cake topper!

Enjoy you pie!

Victoria 

Chocolate6.jpg

Tarta de tomate, queso feta y alcachofas / Tomato, feta cheese and artichokes tart

tarta4

Hola hoy os traigo una tarta salada de queso feta, tomates cherry y alcachofas, es muy fácil!

Hello! Today I bring you a cherry tomatoes, feta cheese and artichokes tart! Very easy and perfect for dinner!

Necesitaréis:

  • 225gr de pasta filo
  • 3 huevos
  • 225 ml de nata líquida
  • albahaca cortada finita
  • 150 gr de queso feta
  • 200 gr de tomates cherry
  • 200 gr de alcachofas en conserva
  • Mantequilla

You will need:

  • 225 gr filo pastry
  • 3 eggs
  • 225 ml of cream
  • Some chopped basil
  • 150 gr feta cheese
  • 200 gr cherry tomatoes
  • 200 gr of canned artichokes
  • Butter

tarta5.jpg

Empezamos precalentando el horno a 160ºC.

Barniza las obleas de pasta filo con un pincel y mantequilla derretida y vete colocándolas una encima de otra en un molde redondo.

Preheat the oven at 160ºC.

Paint the filo pastry sheets with some melted butter and place them ,one on top of the other, in a round mould.

Bate los huevos, añade la nata y la albahaca y bate otra vez. Salpimienta a tu gusto.

Beat the eggs, then add the cream and the basil and beat again. Add some salt and pepper.

 tarta123

Corta las alcachofas en cuatro, el queso feta en cubitos y los tomates por la mitad. Distribuye todo sobre la pasta filo, yo tuve que hacer varias capas. Vierte encima la mezcla de nata y huevos.

Chop the artichokes, tomatoes and feta cheese and place them on the filo pastry. I had to do more that one layer. Then pour in the mixture of eggs and cream.

Hornea 1 hora aproximadamente o hasta que cuaje y sirve acompañado de una ensalada.

Bake for an hour or until set and serve with some green salad.

Espero que os haya gustado!

Victoria ♥

Hope you liked it!

Victoria

tarta6.jpg

Tarta de Calabaza / Pumpkin Pie

topview.jpg

Hola!! Feliz Halloween!!
Hoy os traigo un ultimo post de Halloween. Una receta muy americana : tarta de calabaza. Para ella podéis utilizar la pulpa de la calabaza que hayáis vaciado.

Hey! Happy Halloween!
This will be the last Halloween post, a very typical recipe: pumpkin pie!!
If you have carved a pumpkin you can use the flesh of that pumpkin!

slice.jpg

Vais a necesitar:

  • 500 gr de calabaza cocida y pasada por la batidora
  • 2 huevos
  • 140 ml de nata líquida
  • 170 gr de azúcar moreno
  • 1 rollo de pasta brisa
  • 1 cucharadita de canela
  • 1 cucharadita de jengibre en polvo
  • Nuez moscada rallada

You will need:

  • 500 gr of pumpkin puree
  • 2 eggs
  • 140 ml of double cream
  • 170 gr brown sugar
  • 1 roll of short crust pastry
  • 1 tsp of cinnamon
  • 1 tsp of ginger powder
  • a pinch of nutmeg

sideview.jpg
Precalentamos el horno a 200 ºC.
Extendemos la masa sobre un molde de tarta. Vamos a hornearla antes de hacer el relleno. Para que no se hinche, colocamos papel de horno encima y ponemos garbanzos u otro tipo de legumbre. Metemos al horno hasta que se doren los bordes.
Cuando esté la sacamos del horno y bajamos la temperatura a 160 ºC.

Preheat the oven at 200 ºC.
Extend the pastry on a pie mould. What we are going to do is prebake it, before putting the filling in. For this, put some oven paper over the short crust pastry and place some chickpea on top of it, this way it won’t raise.
Bake until the sides are golden. When this happens take it out of the oven and turn down the temperature to 160 ºC

crust.jpg
Mientras tanto mezclamos los huevos con la calabaza. Añadimos el azúcar y la nata y volvemos a mezclar. Por ultimo incorporamos la canela, el jengibre y la nuez moscada.

Meanwhile mix the eggs and the pumpkin. Add the sugar and the cream and blend together. Mix in the cinnamon, ginger and nutmeg.
filling.jpg
Vertemos las mezcla sobre la masa y horneamos 1:20 hasta que esté cuajada.

Pour the filling in and bake for 1:20 until set.
SONY DSC
Dejamos templar antes de comer. Servimos con un poco de nata montada.

Let it cool and serve with some whipped cream.


Espero que paséis terrorífica noche de Halloween!!

P.D. Si no conseguís una calabaza podéis echar mano de una piña!

Victoria ♥


Hope you have a scary Halloween night!!

P.S. If you can’t find a pumpkin, you can always use a pineapple!
Victoria

happyhalloween.jpg


Calabaza de Halloween / Jack-O’Lantern

SONY DSC

No se puede celebrar Halloween sin una calabaza! En este post os voy a enseñar lo fácil que es vaciar vuestra propia calabaza en casa!

You can’t celebrate Halloween without a pumpkin! On this post I’m going to show you how to carve your own pumpkin for a perfect Halloween!

Necesitaréis:

  • una calabaza
  • un rotulador, mejor permanente
  • un cuchillo grande, bien afilado
  • un cuchillo pequeño
  • un utensilio para hacer bolitas de melón o para hacer bolas de helado
  • una velita

You will need:

  • a pumpkin
  • a marker, better if it’s permanent
  • a sharp knife
  • an ice-cream scoop
  • a tea light

SONY DSC

Empezamos dibujando un circulo en la parte superior y la cara que queramos en uno de los lados de nuestra calabaza. Sabed que si añadís muchos detalles será más complicado cortarlo después.

Start by drawing a circle on the top and a face for the pumpkin on one of its sides. Know that if you include lots of details it will be harder to cut them of later on.

toppumpkin.jpg

Con la ayuda de un cuchillo cortamos el circulo que será la tapa. El cuchillo debe de introducirse inclinado y no recto desde arriba. Queremos conseguir una tapa que tenga forma de cono por debajo, así será más fácil sacarla y luego no se nos meterá hacia dentro.

With a knife, cut the circle, that will be the lid. The knife needs to be introduced at an angle, not straight from the top. That way our lid will be cone-shaped and it will be easier to get out and will fit in perfectly.

insidepumpkin.jpg

Ahora hay que vaciar por completo la calabaza, sacando primero las semillas y luego la carne de las paredes. ¡No tiréis nada! Las semillas se pueden tostar y tengo algo especial preparado en el post de mañana para la carne de la calabaza!

Now you need to scoop out first the seeds and then the pumpkin flesh. Do not throw anything away! You can toast the seeds in the oven and I have a very special post for tomorrow where we will be using the pumpkin flesh.

inside2.jpg

Ahora con cuidado cortamos los ojos, nariz y boca.

Carefully cut out the mouth, eyes and nose of your pumpkin.

eyesmouth.jpg

Le pasamos un trapo por encima para limpiarla y que no esté pegajosa y metemos una velita dentro.

Clean it with a cloth so that it is not sticky, then put a tea light inside.

Ya tenéis vuestra calabaza! Podéis guardar la carne de la calabaza en un bol cubierto de papel film en la nevera durante 48 horas.

Your pumpkin is now ready!! You can keep the pumpkin chunks in a covered bowl in your fridge for about 48 hours.

halloweentomorrow

Gracias por leerme

Victoria ♥

Thanks for reading

Victoria ♥

Cupcakes de Halloween #2 / Halloween Cupcakes #2

witches.jpg

Hola! Aquí llega otra entrega de como decorar cupcakes para Halloween!

Hello! Here is an other post on how to decorate cupcakes for Halloween!

Para las cupcakes de bruja boca abajo necesitaréis:

  • buttercream verde
  • cartulina negra
  • lapiz + tijeras
  • pajitas con espirales cortadas por la mitad

For the upside down witch cupcakes you will need:

  • green buttercream
  • black cardboard
  • pencil + pair of scissors
  • spiral straws cut in half

howtowitchlegs.jpg

En la cartulina dibujamos y recortamos los zapatos de bruja.

Hacemos 2 cortes en uno de los lados de la pajita y insertamos el zapatito.

Extendemos la buttercream sobre la cupcake y clavamos con cuidado ambas piernas de la bruja.

On the cardboard draw and cut the witch’s shoes. 

Make two small cuts at one of the ends of the straw and insert the little shoe in them.

Spread some buttercream on the cupcakes and stick the witch’s legs.

Para los cupcakes con el sombrero de bruja necesitaréis:

  • buttercream naranja
  • fondant negro
  • fondant naranja
  • fondant blanco
  • oreos machacadas

For the witch’s hat cupcakes you will need:

  • orange buttercream
  • black fondant
  • orange fondant
  • white fondant
  • crushed oreos

witchhat1.jpg

Empezamos haciendo un disco con el fondant negro, esta será la base del sombrero. Después hacemos un cono y le vamos dando forma de garfio. Con un poco de buttercream o de agua pegamos ambas partes.

Para la banda naranja, hacemos un espagueti con el fondant y lo aplastamos. Lo enrolamos cubriendo la union entre la base y el cono y sellamos bien.

Para la hebilla hacemos un espagueti muy muy fino con el fondant blanco y cortamos cuatro trocitos que pegaremos con un poquito de agua a la banda naranja.

Start by making a disk with the black fondant, this will be the base of the hat. Then make a cone and give it the shape of a hook. With some buttercream or water stick both parts together.

For the sash, make a spaghetti with the orange fondant. flatten it and make it go around the union of the black base with the black cone.

For the buckle, make a really thin spaghetti and cut four small pieces. With a little bit of water stick them on the orange sash.

witchhat.jpg

Cubrimos la cupcake con buttercream, espolvoreamos las oreos y colocamos el sombrero de bruja. Ya está!

Spread some buttercream on the cupcake, sprinkle some crushed oreos and place the hat on top of it. You are done!

Gracias por leerme!

Victoria ♥

Thanks for stopping by!

Victoria ♥

Cupcakes de Halloween #1 / Halloween cupcakes #1

cupcakerip.jpg

Hola! Volvemos con un post especial Halloween! Esta vez las protagonistas son las cupcakes. En este post y en el siguiente os enseñaré unos tutoriales para decorar cupcakes que den mucho miedo!

Hey! Here I am again with another Halloween post. But this time we will be decorating cupcakes! On this post and the next one, I will show you different ways of decorating you Halloween cupcakes!
Para estas cupcakes de cementerio necesitarás:

  • buttercream blanco
  • oreos machacadas
  • tapas de oreo con 2 lados cortados
  • fondant naranja
  • fondant verde

For these graveyard cupcakes you will need:

  • white buttercream
  • crushed oreos
  • oreos lids (no cream) cut on the sides 
  • orange fondant
  • green fondant

cupcakeripclose.jpg
Empezamos escribiendo RIP con buttercream en la tapa de oreo que habremos cortado ligeramente por los costados para que parezca una lapida. Para ello podemos meter parte de la buttercream en un biberón o en una manga pastelera con boquilla fina.

Cubrimos la cupcake con buttercream sin que quede perfecta. Es mejor que tenga aspecto desordenado.

First, write RIP using some buttercream on the oreo lid that we have trimmed on the edges so that it looks like a tombstone.

Cover the cupcake with some buttercream, it doesn’t need to be perfect. In fact it is better if it looks messy.

howtopumkin.jpg
Para la calabaza hacemos una bolita con el fondant naranja y con un palillo le hacemos un agujero arriba. Con la hoja de un cuchillo le vamos haciendo lineas de arriba hacia abajo. Damos forma a un trocito de fondant verde y lo intruducimos en el agujero como si fuese el tallo.
Hacemos una culebrilla ,que será una raíz verde, con otro trocito de fondant verde y le añadimos unas hojas aplastando unas bolitas de fondant.

For the pumpkin we make a small ball and make a hole on the top. Using a knife we draw some lines from the top to the bottom. Then with some green fondant we make a small stalk and insert it in the little hole.
Take another piece of green fondant and make a little snake, that will be a green root, add some leaves by squashing little balls of fondant and sticking them to the root.

cupcakehowto1.jpg
Espolvoreamos oreos machacadas sobre la buttercream. Depues incrustamos la lapida y colocamos la calabaza y las raices verdes.

Sprinkle some crushed oreos on the buttercream. Then insert the grave and place the pumpkin and the green root.

Y listo! Espero que os haya gustado!
Victoria ♥

and that’s it! Hope you liked it!
Victoria ♥

Ojos de Halloween / Halloween eyes

oneeye.jpg

Hola de nuevo! Aquí va la tercera receta hecha con oreos: ojos de Halloween! La gente se sorprenderá al probarlos! Están buenísimos!

Hey again! Here is the third oreo recipe: Halloween eyes! People will be surprised of how good they are!

eyeseyes.jpg

Para unos 20 ojos necesitareis:

  • un paquete de oreos doble crema
  • 110 gr. de queso Philadelphia
  • fondant blanco
  • rotuladores de tinta comestible

For around 20 eyes you will need:

  • a package of double stuffed oreos
  • 110 gr. of cream cheese
  • white fondant
  • edible color markers

spookeyes.jpg

Primero trituramos la oreos a mano o con algún tipo de batidora (turmix o termomix). Mezclamos con el queso hasta formar una masa. Hacemos bolitas con la mano y las colocamos en un plato. Cuando tengamos todas, metemos el plato al congelador durante 20 minutos.

First crush the oreos by hand or using a food processor. Mix the oreos with the cream cheese until you get a pretty solid dough. Make little balls using your hands and place them on a plate. When you are finished with the dough, put the balls in the freezer for 20 minutes.

eyeinside.jpg

Mientras tanto amasamos el fondant usando un rodillo y con un corta pastas hacemos círculos de unos 6/7 cm, dependiendo del tamaño que habéis dado a las bolitas.

Meanwhile roll out the fondant using a rolling pin and with the help of a cookie cutter make circles of about 6/7 cm, depending on the size of your dough balls.

eyesfondant.jpg

Forramos cada bolita con un circulo de fondant. A continuación dibujaremos el iris del color que queramos y después la pupila. Por ultimo añadiremos algunas venas en los costados.

Os recomiendo que los guardéis en la nevera hasta que vayáis a comerlos, así tendrán la consistencia perfecta.

Cover each little ball with a circle of fondant. Next paint the iris with your favorite color and then the pupil. Finally draw some veins on the side. 

I recommend you to keep then in the fridge until you are going to eat them, that way they will have the perfect consistency.

eyescolor.jpg

Espero que os gusten!

Victoria♥

Enjoy them!

Victoria♥

eyeshalloween.jpg

Murciélagos de oreo / Oreo bats

oreobat4.jpg

Hola! Segundo post especial Halloween con Oreos! Hoy tocan uno murciélagos que parte de estar muy buenos quedan genial como decoración para vuestra mesa de Halloween.

Hey! Today I bring you the second special Halloween treat, made of Oreos! These spooky bats are not only yummy but will make a perfect decoration on your Halloween table.

Para 9 murciélagos necesitaras:

  • un trozo de cartulina negra
  • lápiz
  • tijeras
  • 9 palitos de brocheta
  • 9 oreos doble crema (Importante que sean doble crema o el palito romperá la galleta!)
  • una tableta de chocolate con leche (o el que más os guste)
  • ojos de azúcar (disponibles en tiendas de repostería creativa o en el Corte Inglés)

For 9 bats you will need:

  • A piece of black cardboard
  • A pencil
  • A pair of scissors
  • 9 wooden sticks
  • 9 double stuffed oreos (they need to be double stuffed or the stick will break the cookie!)
  • a bar of milk chocolate (or the type you prefer)
  • Candy eyes

vamp.jpg

Lo primero es hacer las alas de los murciélagos. Clicar aquí para el link a la plantilla que yo usé (del blog Our Best Bites). Imprimirla y copiarla 18 veces en la cartulina negra. Recortar y reservar.

First of all you need to make the wings. Here is the link for the silhouette I used (from Our Best Bites blog). Print it and copy it, 18 times, on your black cardboard. Cut it and keep aside.

oreogrid.jpg

Ahora toca insertar los palitos en las oreos con mucho cuidado. Derretimos el chocolate la baño maría y dejamos que de enfrié un poco. Hundimos nuestras Oreos en el chocolate, quitando el exceso, y les añadimos las alas y los ojos. Dejamos que se sequen por completo apoyadas en papel de horno.

Now insert the sticks in the Oreos, very carefully. Then melt the chocolate over a double boiler and wait for it to cool down a little bit. Deep the Oreos in the chocolate and smooth away the excess. Add the wings and the eyes and allow to set completely (place then on some baking paper).

 batss.jpg

Espero que os haya gustado!!

Victoria♥

Hope you liked it!

Victoria♥